123
NET/USB (TX-NR906 only)—Continued
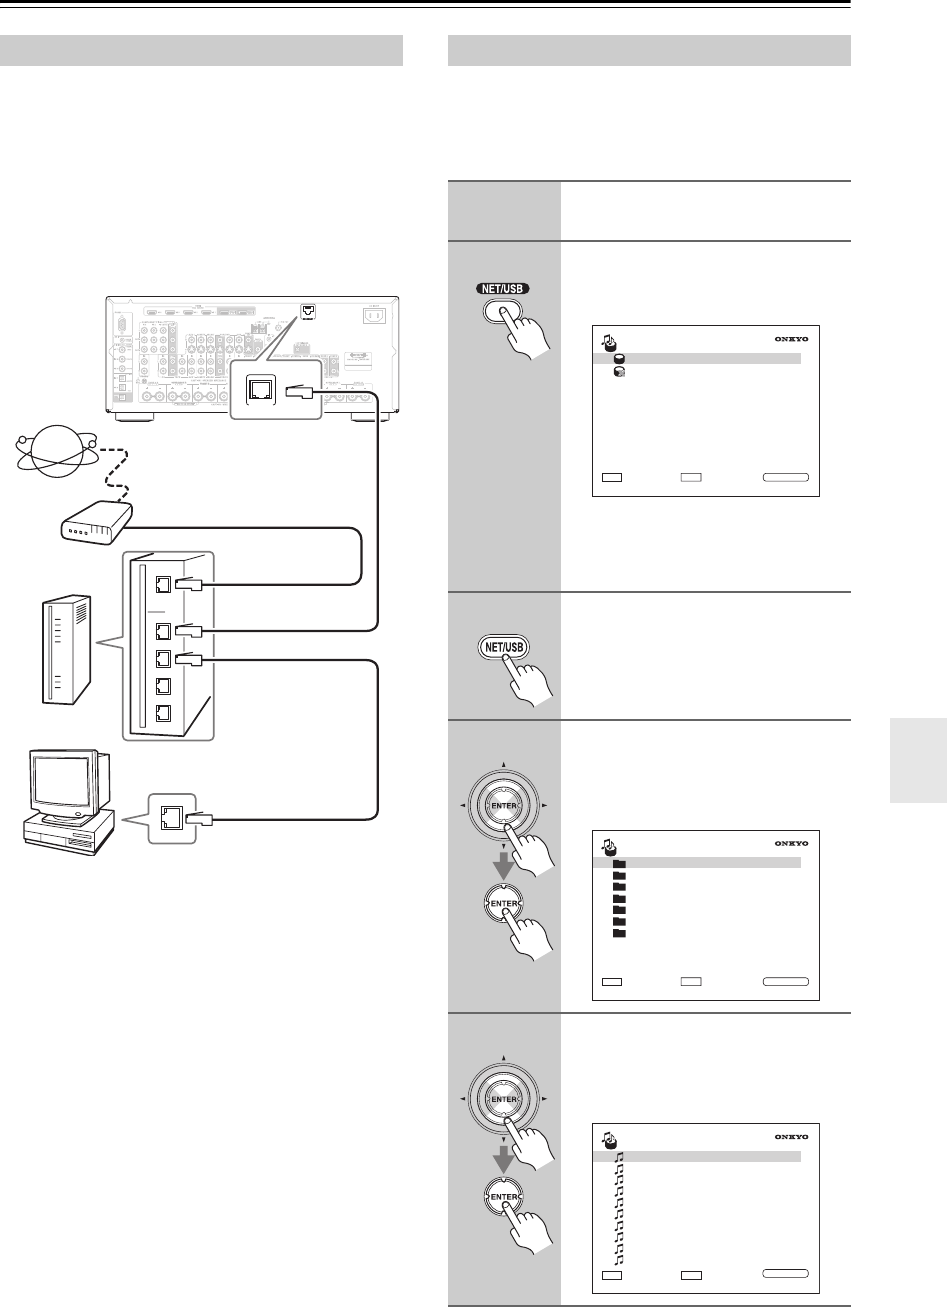
To connect the AV receiver to your home network, plug
one end of a shielded CAT5 Ethernet cable into the AV
receiver’s ETHERNET port, and plug the other end into
a LAN port on your router or switch.
The following diagram shows how you can connect the
AV receiver to your home network. In this example, it’s
connected to a LAN port on a router, which has a 4-port
100Base-TX switch built-in.
This section explains how to play music files on a com-
puter or media server through the AV receiver. See
page 121 for details on supported music servers and
music file formats.
Connecting the AV Receiver
ETHERNET
TX-NR906
Internet
radio
Modem
Router
Computer or media server
LAN/Ethernet port
WAN port
LAN port
LAN port
Playing Music Files on a Server
1
Start your computer or media
server.
2
Press the [NET/USB] INPUT
SELECTOR button to select the
Server screen.
The NETWORK indicator lights up if
the AV receiver is able to establish a
connection to the server. It flashes if a
connection cannot be established.
3
Press the [NET/USB] REMOTE
MODE button to select the
NET/USB remote controller
mode.
4
Use the Up and Down [ ]/[ ] but-
tons to select a server, and then
press [ENTER].
A list of items on the server appears.
5
Use the Up and Down [ ]/[ ] but-
tons to select an item, and then
press [ENTER].
A list of music files appears.
NET/USB
REFRESH
1 / 5
USB/iRADIO
RETURN
Server
Server1: Shared1
server: MYPC
NET/USB
REFRESH
1 / 10
USB/iRADIO
RETURN
Server1: Shared1
Recently Added
Artists
Album
Songs
Genre
Year
Rating
All Music
Song 1
NET/USB
RETURN
RETURN
1 / 11
USB/iRADIO
Song 2
Song 3
My favorite song 1
My favorite song 2
My favorite song 3
My favorite song 4
My favorite song 5
My favorite song 6
My favorite song 7


