Saving and recalling the system settings (System Memory)
97 En
Advanced
Operation
y
• If you select “Zone2”, “Zone3”, or “Zone4” in step 3, you can select
“Memory1” to “Memory4”. You can save the parameters for the selected zone
only when the zone is turned on.
• If system settings are already saved in the selected memory number, this unit
overwrite to old system settings.
• If you save the system settings to “Memory1” to “Memory4”, you can load the
stored settings by pressing the corresponding 7SYSTEM MEMORY buttons
(see page 98).
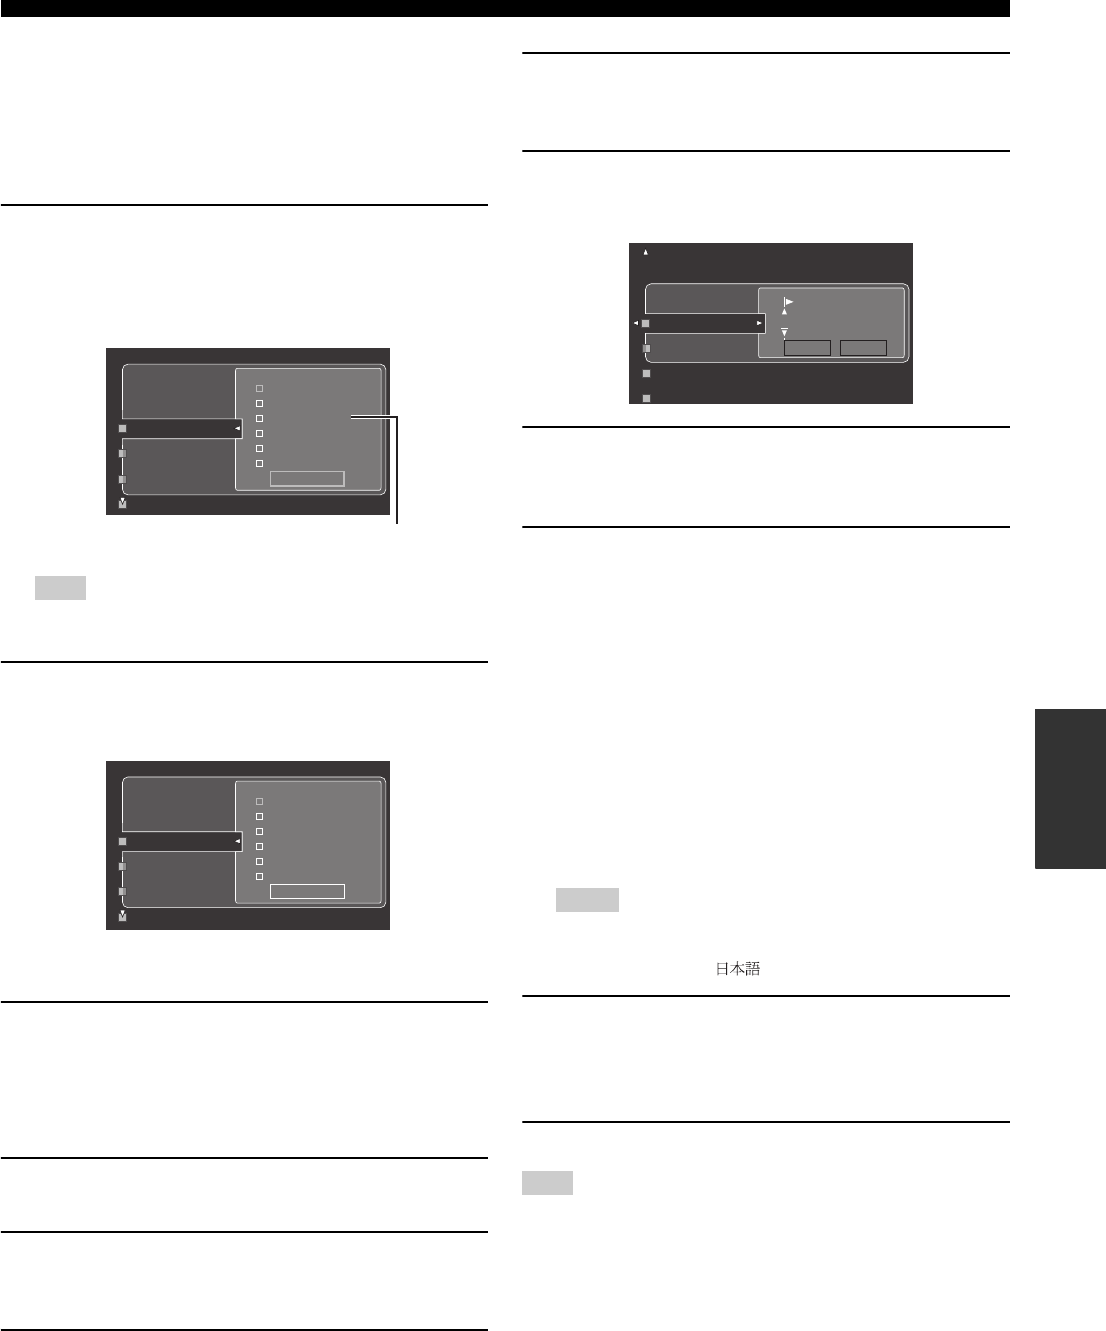
6 Press 9k / n repeatedly to select the group of
parameters and then press 9ENTER to select or
clear the check box of the group.
This unit saves the parameters in the checked groups. Refer to
“Saved parameters for the main zone” on page 98.
If the selected zone is other than “Main”, you can select “Input”, “Volume”, and
“Tone Control”. See page 98 for details.
7 Press 9n repeatedly to select “Save” and then
9ENTER to save the current system settings to the
selected memory number.
y
You can cancel the saving by pressing 9l.
8 Press
I
MENU again to exit from the GUI menu.
■ Renaming the stored settings
Use this feature to rename the stored settings. The name of each
memory number appears in the GUI menu or front panel display.
1 Press
I
MENU on the remote control.
The top menu appears in the video monitor.
2 Press 9k / n repeatedly to select “System Memory”
and then press 9h.
The “System Memory” menu appears in the video monitor.
3 Press 9k / n repeatedly to select the desired zone
and then press 9h.
In the following example, “Main” is selected.
4 Press 9k / n repeatedly to select “Main Rename”
(example) and then 9h.
The list of the memory number appears in the video monitor.
5 Press 9k / n repeatedly to select the desired
memory number and then 9h.
The rename display appears in the video monitor.
6 Press
9
ENTER repeatedly to select a character type
(CAPITAL/SMALL/LATIN CAPITAL/LATIN SMALL/
FIGURE/MARK).
7 Press
9
k / n to select the character you want to use
and
9
l / h to move to the next one.
• You can use up to 9 characters for each memory.
• Press
9
n to change the character in the following order, or
press
9
k to go in the reverse order:
CAPITAL A to Z, space
SMALL a to z, space
LATIN CAPITAL Ä, Ö, Ü, etc.
LATIN SMALL ä, ö, ü, etc.
FIGURE 0 to 9, space
MARK !, #, %, &, etc.
• Press
9
ENTER to switch between character types.
y
Press 9h repeatedly to select “RESET” and then press 9ENTER to set the
name of the memory to the initial name.
• The character types you can select differ depending on the setting in
“Language” (see page 95).
• If you set “Language” to “ ”, you can also select Japanese characters.
8 Press
9
h repeatedly to select “OK” and press
9
ENTER when complete.
y
Repeat steps 5 to 7 to rename each input.
9 Press
I
MENU again to exit from the GUI menu.
If you change the setting of “Language” (see page 95) or “LANGUAGE” (see
page 120), the name of each system memory are automatically set to the initial name of
the selected language.
Note
✓
✓
✓
✓
✓
Memory1
Memory2
Memory3
Main Save
Input/HDMI Out
Audio
Volume
SP Config
Video
Option
Save
Current selected group of the parameters
appears in red
Select: ENTER
✓
✓
✓
✓
✓
Memory1
Memory2
Memory3
Main Save
Input/HDMI Out
Audio
Volume
SP Config
Video
Option
Save
Save: ENTER
Notes
Note
Memory1
Memory2
Memory3
CAPITAL
Memory1
OK RESET


