


Troubleshooting
127 En
Additional
Information
During Auto Setup
After Auto Setup
• If the “ERROR” or “WARNING” screens appears, check the cause of the problem, then run “Auto Setup” again.
• If warning “W2” or “W3” appears, the adjustment are made, however the adjustments may not be optimal.
• Depending on the speakers, warning “W1” may appears even if the speakers connections are correct.
• If error “E10” occurs repeatedly, please contact a qualified Yamaha service center.
■ Resetting the system
Use this feature to reset all the parameters of this unit to the initial
factory settings.
• This procedure completely resets all the parameters of this unit including
the GUI menu parameters.
• The initial factory settings are activated next time you turn on this unit.
y
To cancel the initialization procedure at any time without making any
changes, press
B
MASTER ON/OFF on the front panel to release it
outward to the OFF position.
1 Press
B
MASTER ON/OFF on the front panel to
release it outward to the OFF position to turn off this
unit.
2 Press and hold
I
PROGRAM and then press
B
MASTER ON/OFF inward to the ON position to
turn on this unit.
Press and hold IPROGRAM until “ADVANCED SETUP”
appears in the front panel display (see page 119).
3 Rotate
I
PROGRAM to select “INITIALIZE”.
4 Press
I
PROGRAM repeatedly to select “ALL”.
y
• Select “CANCEL” to cancel the initialization procedure without
making any changes.
• You can initialize the video parameters or sound field program
parameters separately. See page 120 for details.
5 Press
B
MASTER ON/OFF to release it outward to
the OFF position to confirm your selection and turn
off this unit.
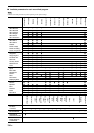
Error message Cause Remedy See page
E01:No Front SP Front L/R channel signals are not detected. Check the front L/R speaker connections. 23
E02:No Sur. SP A surround channel signal is not detected. Check the surround speaker connections. 23
E03:No F. PRNS SP A front presence channel signal is not detected. Check the front presence speaker connections. 23
E04:SBR → SBL Only right surround back channel signal is detected. Connect the surround back speaker to the
SUR.BACK/BI-AMP (SINGLE) terminal if you
only have one surround back speaker.
23
E05:Noisy Background noise is too loud. Try running “Auto Setup” in a quiet environment.
—
Turn off noisy electric equipment like air
conditioners or move them away from the optimizer
microphone.
—
E06:Check Sur. Surround back speakers are connected, though
surround L/R speakers are not.
Connect surround speakers when you use surround
back speakers.
23
E07:No MIC The optimizer microphone was unplugged during
the “Auto Setup” procedure.
Connect the supplied optimizer microphone to the
OPTIMIZER MIC jack on the front panel.
43
E08:No R.PRNS SP A rear presence channel signal is not detected. Check the rear presence speaker connections. 23
E09:User Cancel The “Auto Setup” procedure was cancelled due to
user activity.
Run “Auto Setup” again. 42
E10:Internal Err. An internal error occurred. Run “Auto Setup” again. 42
Warning message Cause Remedy See page
W1:Out of Phase Speaker polarity is not correct. This message may
appear depending on the speakers even when the
speakers are connected correctly.
Check the speaker connections for proper polarity
(+ or –).
23
W2:Over Distance The distance between the speaker and the listening
position is over 24 m (80 ft).
Bring the speaker closer to the listening position.
—
W3:Level Error The difference of volume level among speakers is
excessive.
Readjust the speaker installation so that all speakers
are set in locations with similar conditions.
—
Check the speaker connections. 23
Use speakers of similar quality.
—
Adjust the output volume of the subwoofer. 42
W4:SP Mismatch The result of the wiring check of “Auto Setup” is
different from “Speaker Set” in “Manual Setup”.
Use “Speaker Set” in “Manual Setup” to adjust the
speaker settings manually.
84
“Wiring” check procedure is skipped. Select “Wiring” in “Setup Menu”. 44
Notes
Notes