


Removal and Replacement
6–10
WFM 90 and WFM 91 Service Manual
NOTE. Some early instruments used cushion pads instead of locating feet to hold
the display module in position. If your instrument has cushion pads, replace the
pads at this time with locating feet. Contact your local Tektronix representative
to order the necessary parts.
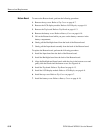
To replace the LCD display module, perform the following procedure:
CAUTION. To avoid miscalibrating your display module, do not touch the display
adjustments on the backside of the display module. These adjustments are set by
the manufacturer and should not be adjusted.
1. If you have replaced the display module with a new one, attach the cushion
padding around the display module. Refer to Display Padding on page 6–11.
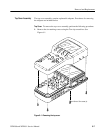
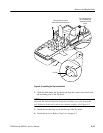
2. Connect the ribbon cable from the Bottom board into the back of the display
module.
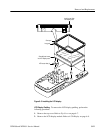
NOTE. The cable connecting the display module to the Bottom board is a zero
insertion-force ribbon cable. To install the cable into the connector, pull out the
connector latch and then push the ribbon cable into the connector housing.
When the cable rests against the back of the connector, press in the connector
latch to lock the cable in place. See Figure 6–2.
3. If you are replacing the ribbon cable, set the LCD display just above its
resting position on the locating feet. Use your finger to crease the ribbon
cable so that when the LCD display is set down on the locating feet, the
ribbon cable does not raise the LCD display up off of the locating feet.
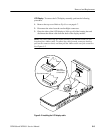
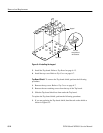
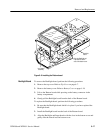
4. Set the LCD display module onto the four locating feet. The locating feet fit
into small holes in each of the four corners on the back of the LCD display.
See Figure 6–3.
5. Connect the backlight wires to the connectors on the side of the display
module.
6. If you have replaced the display module with a new one, carefully remove
the protective plastic cover from the face of the LCD display by prying up
the corner of the cover and pulling it off of the display.
7. If necessary, clean the front of the LCD display. Refer to Cleaning on
page 6–3.
8. Install the top cover. Refer to Top Cover on page 6–7.