


Adjustment Procedures
5–6
WFM 90 and WFM 91 Service Manual
22. Adjust the Arrow Buttons for a sweep length of 12 major divisions.
23. Select CAL MENU, and then select SAVE.
24. Select 2H SWEEP from the Operating menu.
25. Select MAG REG from the Calibration menu, and then select CAL.
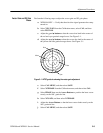
26. Select POS, and then use the Arrow Buttons to position the falling edge of
sync to the center graticule tick mark.
27. Select MAG ON, and then select MAG REG.
28. Adjust the Arrow Buttons to reposition the falling edge of sync to the center
graticule tick mark.
29. Select MAG OFF.
30. Select CAL MENU, and then select SAVE.
Perform the following steps to adjust the vertical gain and X5 gain registration:
1. Replace the signal on the VIDEO IN connector with the output from the
VAC. Do not terminate the input.
2. Set the VAC for a 999.9 mV output with all of the buttons out except +LUM
and NTSC (PAL button for the WFM 91).
3. Select X1 GAIN from the Calibration menu, and then select CAL.
4. Adjust the Arrow Buttons for a display amplitude of exactly 140 IRE
(1000 mV PAL).
5. Select CAL MENU, and then select SAVE.
6. Set the VAC for a 199.9 mV output.
7. Select X5 GAIN from the Operating menu.
8. Select X5 GAIN from the Calibration menu, and then select CAL.
9. Adjust the Arrow Buttons for a display amplitude of exactly 140 IRE
(1000 mV PAL).
10. Select CAL MENU, and then select SAVE.
11. Replace the signal on the VIDEO IN connector with a 75% color bar signal
from the television signal generator, using a 75 W in-line terminator.
12. Select X5 POS from the Calibration menu, and then select CAL.
13. Select X1 GAIN, and then position the signal baseline to the graticule
baseline.
Vertical Gain and X5 Gain
Registration