


Removal and Replacement
6–18
WFM 90 and WFM 91 Service Manual
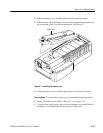
4. Install the Top board. Refer to Top Board on page 6–13.
5. Install the LCD display module. Refer to LCD Display on page 6–9.
6. Install the top cover. Refer to Top Cover on page 6–7.
7. Install the battery cover. Refer to Battery Cover on page 6–18.
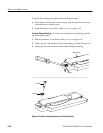
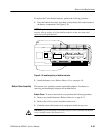
To remove the Input board, perform the following procedure:
1. Remove the top cover. Refer to Top Cover on page 6–7.
2. Remove the battery cover. Refer to Battery Cover on page 6–18.
3. Lift on the Bottom board while you press on the battery connector in the
battery compartment.
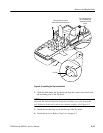
4. Gently pull the Input board assembly from the back of the Bottom board.
5. Unscrew the retaining nuts from the three BNC connectors on the rear panel.
6. Pull the rear panel cover off of the BNC connectors.
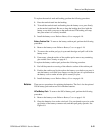
To replace the Input board, perform the following procedure:
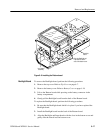
1. Install the rear panel cover over the BNC connectors on the Input board.
2. Install the retaining nuts onto the three BNC connectors on the rear panel.
3. Install the Input board assembly onto the back of the Bottom board.
4. Align the Backlight and Input boards with the slots in the bottom cover and
gently slide the boards into the bottom cover.
5. Install the top cover. Refer to Top Cover on page 6–7.
6. Install the battery cover. Refer to Battery Cover on page 6–18.
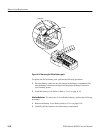
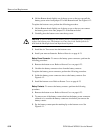
The battery cover assembly contains replaceable subparts. Procedures for
removing the subparts are included below.
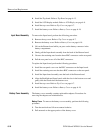
Battery Cover. To remove the battery cover assembly, perform the following
procedure:
1. Turn the turnlock stud 1/4-turn counterclockwise.
2. Pull outwards on the upper portion of the battery cover.
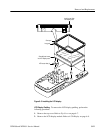
Input Board Assembly
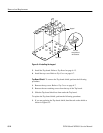
Battery Cover Assembly