


Removal and Replacement
6–8
WFM 90 and WFM 91 Service Manual
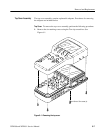
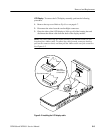
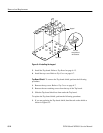
2. Gently lift the top cover off of the bottom cover.
NOTE. When you are disassembling the WFM 90 or WFM 91, do not let dust
accumulate inside of the top cover. Set the top cover face up on your work
surface or cover it with a lint-free cloth to prevent dust from accumulating on the
inside surface of the cover.
To replace the top cover assembly, perform the following procedure:
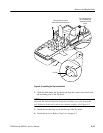
1. Make sure that the battery and backlight wires are positioned so that they
will not be pinched between the top and bottom covers.
2. Align the top cover over the bottom cover so that the keypad buttons will
slide through the top cover keypad holes.
3. Gently lower the top cover onto the bottom cover. A slight shaking motion
of the top cover may be necessary to help the keypad buttons slide through
the top cover holes.
4. Install the six retaining screws using the Torx-tip screwdriver.
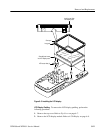
LCD Display Lens. To remove the LCD display lens, perform the following
procedure:
1. Remove the top cover. Refer to Top Cover on page 6–7.
2. Press firmly on the LCD display lens from the front of the top cover until it
comes loose from the top cover.
3. Clean any remaining glue residue from the top cover. Refer to Cleaning on
page 6–3.
To replace the LCD display lens, perform the following procedure:
1. Remove the protective cover from the cushion on the new LCD display lens.
2. Align the LCD display lens with the depression in the backside of the top
cover and press the lens into place.
3. Install the top cover. Refer to Top Cover on page 6–7.
The LCD display assembly contains replaceable subparts. Procedures for
removing the subparts are included below.
CAUTION. To avoid damaging the LCD display, do not touch the face of the
display because it is hard to clean and is easily scratched.
LCD Display Assembly