


En
8
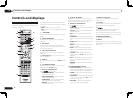
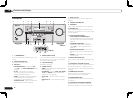
02 Controls and displays
8 i/j/k/l/ENTER
Use the arrow buttons when setting up your
surround sound system (see page 59) and the
Audio or Video options (page 47 or 49).
9 Receiver Control buttons
Press first to access:
! PHASE CTRL – Press to switch on/off Phase
Control (page 38).
! STATUS – Press to check selected receiver
settings (page 51).
! PQLS – Press to select the PQLS setting
(page 45).
! S.RETRIEVER – Press to restore CD quality
sound to compressed audio sources (page
47).
! SIGNAL SEL – Use to select an input signal
(page 37).
! MCACC – Press to switch between MCACC
presets (page 37).
! SLEEP – Use to put the receiver in sleep
mode and select the amount of time before
sleep (page 51).
! CH LEVEL – Press repeatedly to select a
channel, then use k/l to adjust the level
(page 66).
! A.ATT – Attenuates (lowers) the level of an
analog input signal to prevent distortion
(page 51).
! DIMMER – Dims or brightens the display
(page 51).
10 LISTENING MODE controls
! AUTO/ALC/DIRECT – Switches between
Auto Surround (page 36), Auto Level Control
mode and Stream Direct mode (page 37).
! STEREO – Press to select stereo playback
mode (page 36).
! STANDARD – Press for Standard decoding
and to switch various modes (2 Pro Logic,
Neo:6, etc.) (page 36).
! ADV SURR – Use to switch between the
various surround modes (page 36).
11 Remote control LED
Lights when a command is sent from the
remote control.
12 TV CTRL
Set the preset code of your TV’s manufacturer
when controlling the TV (page 53).
13
Switches the remote to control the receiver
(used to select the white commands).
Switch to perform operations in the main zone.
Also use this button to set up surround sound.
14 MASTER VOLUME +/–
Use to set the listening volume.
15 MUTE
Mutes the sound or restores the sound if it has
been muted (adjusting the volume also restores
the sound).
Controls and displays
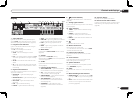
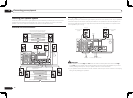
Remote control
This section explains how to operate the remote
control for the receiver.
RECEIVER
D.ACCESS
CH
LEVEL A.ATT
LISTENING MODE
DIMMER
SIGNAL SEL
MCACC SLEEP
TV
/
DTV MPX PQLS
PHASE
CTRL STATUS
PGM
iPod CTRL
HOME
MENU
TUNE
TUNE
TOOLS
LIST
CH
TV CONTROL
INPUT
INPUT
SELECT
iPod
USB
SAT
TUNER
SIRIUS
TV CTRL
ZONE 2
ADPT
CDTV
RCU SETUP
SOURCERECEIVER
MULTI
OPERATION
BDR
BD DVD DVR
HMG
HDMI
RECEIVER
MUTE
MASTER
VOLUME
VOL
PRESET
TOP MENU
BAND GUIDE
T.EDIT
VIDEO
PARAMETER
AUDIO
PARAMETER
ENTER
PRESET
RETURN
CATEGORY
MEMORY MENU
AUTO
/
ALC
/
DIRECT
STEREO STANDARDADV SURR
AUDIO
INFO
CLASS
ENTER
DISP
HDD DVD
54 6
8
0
7 9
1 3
/
CLR
CH
22
S.RETRIEVER
2
1
2,3
4
5
9
10
6
7
8
11
13
12
14
15
The remote has been conveniently color-coded
according to component control using the follow-
ing system:
! White – Receiver control, TV control
! Blue – Other controls (See pages 29, 30, 32, 34
and 56.)
1 u RECEIVER
This switches between standby and on for this
receiver.
2 MULTI OPERATION
Use this button to perform multi operations
(page 55).
3 RCU SETUP
Use to input the preset code when making
remote control settings and to set the remote
control mode (page 53).
4 Input function buttons
Press to select control of other components
(page 53).
Use INPUT SELECT c/ d to select the input
function (page 29).
5 ZONE 2
Switch to perform operations in ZONE 2 (page
50).
6 TV CONTROL buttons
These buttons are dedicated to control the TV
assigned to the TV CTRL button.
7 Receiver setting buttons
Press first to access:
! AUDIO PARAMETER – Use to access the
Audio options (page 47).
! VIDEO PARAMETER – Use to access the
Video options (page 49).
! HOME MENU – Use to access the Home
Menu (pages 25, 26, 44, 59 and 65).
! RETURN – Press to confirm and exit the
current menu screen.