


En
62
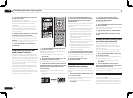
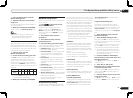
11 The Advanced MCACC menu
Acoustic Calibration EQ
Professional
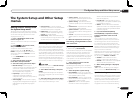
This setup minimizes the unwanted effects of
room reverberation by allowing you to calibrate
your system based on the direct sound coming
from the speakers.
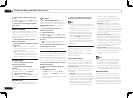
Performing the Acoustic Calibration EQ
Professional procedure is effective when the
lower frequencies seem overly reverberant in
your listening room (i.e. it sounds ‘boomy’) as
shown at Type A below, or when different chan-
nels seem to exhibit different reverb character-
istics as shown at Type B.
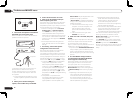
! Type A: Reverberance of high vs. low
frequencies
Level
Acoustic Cal. EQ Pro.
calibration range
Low
frequencies
High
frequencies
Conventional MCACC
EQ calibration range
Time
(in msec)
0
80
160
! Type B: Reverb characteristics for
different channels
Level
0
80
160
Time
(in msec)
Front L
Front R
Acoustic Cal. EQ Pro.
calibration range
Conventional MCACC
EQ calibration range
Using Acoustic Calibration EQ
Professional
1 Select ‘EQ Professional’, then press
ENTER.
2 Select an option and press ENTER.
! Reverb Measurement – Use this to
measure the reverb characteristics before
and after calibration.
! Reverb View – You can check the reverb
measurements made for specified frequency
ranges in each channel.
— If the Reverb View procedure is
performed after the Automatically
conducting optimum sound tuning
(Full Auto MCACC) on page 25 or
Reverb Measurement operation,
depending on the standing wave control
setting, differences may appear on the
reverb graph. With the Auto MCACC
function, the reverberations are
measured with the standing waves
controlled, so the reverb characteristics
graph shows the characteristics with the
effect of the standing waves eliminated.
By contrast, the Reverb Measurement
function measures the reverberations
without controlling the standing waves,
so the graph indicates the reverb
characteristics including the effect
of the standing waves. If you wish to
check the reverb characteristics of the
room itself (with the standing waves
as such), we recommend using the
Reverb Measurement function.
! Advanced EQ Setup – Use this to select the
time period that will be used for frequency
adjustment and calibration, based on the
reverb measurement of your listening area.
Note that customizing system calibration
using this setup will alter the settings you
made in Automatically conducting optimum
sound tuning (Full Auto MCACC) on page 25
or Automatic MCACC (Expert) on page 59 and
is not necessary if you’re satisfied with these
settings.
3 If you selected ‘Reverb Measurement’,
select EQ ON or EQ OFF, and then START.
The following options determine how the reverb
characteristics of your listening area are dis-
played in Reverb View:
waves reflected off the walls in your listen-
ing area. This can have a negative effect on
the overall sound, especially at certain lower
frequencies. Depending on speaker place-
ment, your listening position, and ultimately
the shape of your room, it results in an overly
resonant (‘boomy’) sound. The Standing Wave
Control uses filters to reduce the effect of overly
resonant sounds in your listening area. During
playback of a source, you can customize the
filters used for Standing Wave Control for each
of your MCACC presets.
! Standing Wave control filter settings cannot
be changed during playback of sources using
the HDMI connection.
1 Select ‘Standing Wave’ from the
Manual MCACC setup menu.
2 Adjust the parameters for the Standing
Wave Control.
! Filter Channel – Select the channel to which
you will apply the filter(s): MAIN (all except
center channel and subwoofer), Center or
SW (subwoofer).
! TRIM (only available when the filter channel
above is SW) – Adjust the subwoofer channel
level (to compensate for the difference in
output post-filter).
! Freq / Q / ATT – These are the filter
parameters where Freq represents the
frequency you will be targeting and Q is the
bandwidth (the higher the Q, the narrower
the bandwidth, or range) of the attenuation
(ATT, the amount of reduction to the targeted
frequency).
3 When you’re finished, press RETURN.
You will return to the Manual MCACC setup
menu.
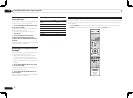
Acoustic Calibration EQ Adjust
! Default setting: ON/0.0dB (all channels/
bands)
Acoustic Calibration Equalization is a kind of
room equalizer for your speakers (excluding the
subwoofer). It works by measuring the acoustic
characteristics of your room and neutralizing
the ambient characteristics that can color the
original source material (providing a ‘flat’ equal-
ization setting). If you’re not satisfied with the
adjustment provided in Automatically conduct-
ing optimum sound tuning (Full Auto MCACC)
on page 25 or Automatic MCACC (Expert) on
page 59 , you can also adjust these settings
manually to get a frequency balance that suits
your tastes.
1 Select ‘EQ Adjust’ from the
Manual MCACC setup menu.
2 Select the channel(s) you want and
adjust to your liking.
Use i/j to select the channel.
Use k/l to select the frequency and i/j
to boost or cut the EQ. When you’re finished,
go back to the top of the screen and press k
to return to Ch, then use i/j to select the
channel.
! The OVER! indicator shows in the display
if the frequency adjustment is too drastic
and might distort. If this happens, bring the
level down until OVER! disappears from the
display.
3 When you’re finished, press RETURN.
You will return to the Manual MCACC setup
menu.
Note
! Changing the frequency curve of one channel
too drastically will affect the overall balance. If
the speaker balance seems uneven, you can
raise or lower channel levels using test tones
with the TRIM feature. Use k/l to select
TRIM, then use i/j to raise or lower the
channel level for the current speaker.