


En
25
04
Basic Setup
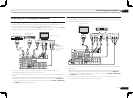
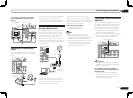
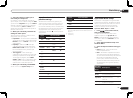
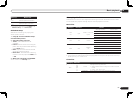
2 Connect the microphone to the MCACC
SETUP MIC jack on the front panel.
CONTROL ON
/
OFF
MCACC
SETUP MIC
iPod
iPhone
iPad
USB
5V 2.1
A
HDMI 2 INPUT
Microphone
Tripod
Make sure there are no obstacles between the
speakers and the microphone.
If you have a tripod, use it to place the micro-
phone so that it’s about ear level at your
normal listening position. If you do not have
a tripod, use some other object to install the
microphone.
Install the microphone on a stable floor.
Placing the microphone on any of the following
surfaces may make accurate measurement
impossible:
! Sofas or other soft surfaces.
! High places such as tabletops and sofa tops.
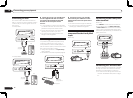
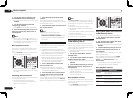
The Full Auto MCACC display appears once the
microphone is connected.
Speaker System : Normal
(
SB/FH
)
1a.Full Auto MCACC
A/V RECEIVER
Exit Return
START
EQ Type : SYMMETRY
MCACC : M1.MEMORY 1
THX Speaker : NO
! If you leave the GUI screen for over five
minutes, the screen saver will appear.
3 Select the parameters you want to set.
! When data measurement is taken, the
reverb characteristics data (both before- and
after-calibration) that this receiver had been
storing will be overwritten.
! When measurement is taken of the reverb
characteristics data other than SYMMETRY,
the data are not measured after the
correction. If you will need to measure after
correcting data, take the measurement
using the EQ Professional menu in the
Manual MCACC setup (page 61).
If the speakers are connected using any setup
other than Normal(SB/FH), be sure to set
Speaker System before the Full Auto MCACC
Setup. See Speaker system setting on page 65 .
! Speaker System – Shows the current
settings. When this is selected and ENTER is
pressed, the speaker system selection screen
appears. Select the proper speaker system,
then press RETURN to return.
If you are planning on bi-amping your front
speakers, or setting up a separate speaker
system in another room, read through
Speaker system setting on page 65 and make
sure to connect your speakers as necessary
before continuing to step 4.
! EQ Type – This determines how the
frequency balance is adjusted.
! MCACC – The six MCACC presets are used
for storing surround sound settings for
different listening positions. Simply choose
an unused preset for now (you can rename it
later in Data Management on page 64 ).
! THX Speaker – Select YES when using THX
speakers (all speakers other than the front
speakers are set to SMALL). In other cases,
leave at NO.
4 Press then select START.
Basic Setup
Changing the OSD display
language (OSD Language)
The language used on the Graphical User
Interface screen can be changed.
! The explanations in these operating
instructions are for when English is selected
for the GUI screen.
1 Press u RECEIVER to switch on the
receiver and your TV.
Make sure that the TV’s video input is set to
this receiver (for example, if you connected this
receiver to the VIDEO jacks on your TV, make
sure that the VIDEO input is now selected).
2 Press on the remote control,
then press HOME MENU.
A Graphical User Interface (GUI) screen
appears on your TV. Use i/j/k/l and
ENTER to navigate through the screens and
select menu items. Press RETURN to exit the
current menu.
3 Select ‘System Setup’ from the Home
Menu.
4 Select ‘OSD Language’ from the
System Setup menu.
5 Select the desired language.
6 Select ‘OK’ to change the language.
The setting is completed and the System Setup
menu reappears automatically.
Automatically conducting
optimum sound tuning (Full
Auto MCACC)
The Full Auto MCACC Setup measures the
acoustic characteristics of your listening area,
taking into account ambient noise, speaker
connection and speaker size, and tests for both
channel delay and channel level. After you have
set up the microphone provided with your sys-
tem, the receiver uses the information from a
series of test tones to optimize the speaker set-
tings and equalization for your particular room.
Important
! Make sure the microphone and speakers are
not moved during the Full Auto MCACC Setup.
! Using the Full Auto MCACC Setup will
overwrite any existing settings for the MCACC
preset you select.
! Before using the Full Auto MCACC Setup, the
headphones should be disconnected.
CAUTION
! The test tones used in the Full Auto MCACC
Setup are output at high volume.
THX
®
! THX is a trademark of THX Ltd., which may
be registered in some jurisdictions. All rights
reserved.
1 Press u RECEIVER to switch on the
receiver and your TV.
Make sure that the TV’s video input is set to this
receiver.