


128
3. Move the cursor to "OK" using the arrows button
(CDAB), and press the SET button. The
camera title will be copied.
• The available characters for a camera title are dif-
ferent depending on the selected language as fol-
lows.
<When any language except RUSSIAN is selected>
0 1 2 3 4 5 6 7 8 9 A B C D E F G H I J K L M N O P
Q R S T U V W X Y Z a b c d e f g h i j k l m n o p q r
s t u v w x y z À Ä Â Æ Ç É Ì Ñ Ò Ö Ù Ü Ø ß à á â ä
å æ ç è é ê ë ì í î ï ñ ò ó ô ö ù ú û ü ø ? " # & ( ) * + ,
- . / : ; SP
<When RUSSIAN is selected>
0123456789ABCDEFGHIJKLMNOPQRSTU
VWXYZabcdefghijklmnopqrstuvwxyzÄÅÇÉ
ÑÖ›Üáàâäãåçéèêëíìîïñóòôöõúù
ûü?"#&()*+,-./:;SP
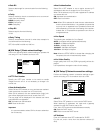
[Screenshot 4]
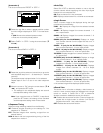
The camera title is entered.
b Press the arrows button (CDAB) to move the cursor
to "OK" and press the SET button.
When the arrows button (C) is pressed while "OK" or
"CANCEL" is selected, the camera title pop-up window
for CAM9 - 16 will be displayed. Repeat steps 2 - 4 to
enter the camera title for CAM9 - 16.
Notes:
• If you move the cursor to "CANCEL" in step 5 and
press the SET button, the setting will be canceled
and the setting window of the camera title will be
closed.
• It is possible to set "Camera Title [Display]" to dis-
play a camera title on monitor 2 and "Camera Title
[Embedded]" to embed/display a camera title on
monitor 1 individually using a PC via a network.
Refer to the Network Setup Instruction (PDF) for fur-
ther information.
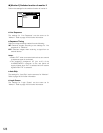
8 Time & Date Display Position
Select a time and date display position from the following.
L-UPPER: Displays the time at the upper left of the screen.
R-UPPER: Displays the time at the upper right of the
screen.
L-LOWER: Displays the time at the lower left of the screen.
R-LOWER: Displays the time at the lower right of the
screen.
Notes:
• When setting the time and date to be recorded together
with images, the time display will be recorded in the
selected position.
• Refer to page 111 for further information about
"Embedded REC (Time & Date)".
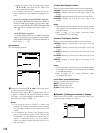
8 Camera Title Display Position
Select a camera title display position from the following.
L-UPPER: Displays a camera title at the upper left of the
screen.
R-UPPER: Displays a camera title at the upper right of the
screen.
L-LOWER: Displays a camera title at the lower left of the
screen.
R-LOWER: Displays a camera title at the lower right of the
screen.
CENTER: Displays a camera title at the center of the
screen.
Notes:
• When setting the camera title to be recorded together
with images, the camera title display will be embedded
in the selected position.
• Refer to page 111 for further information about
"Embedded REC (title)".
8 Line Color on the Multi Screen
Select a line color from the following.
WHITE: Displays white lines.
GRAY: Displays gray lines.
BLACK: Displays black lines.
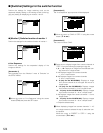
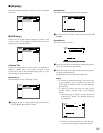
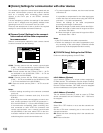
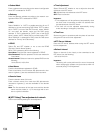
● [Monitor 1] Settings on monitor 1 display
Select ON and OFF whether or not to display the time, cam-
era title and alarm display on monitor 1.
Schedule
Maintenance
Display
Comm
Switcher
SETUP MENU
LIVE
System Recording Event
OSD Setup
Monitor 1
Monitor 2
Quick Menu
ON
■
Time & Date Display
■
Camera Title Display
■
Alarm Display
ON
ON
Advanced
Schedule
Maintenance
Display
Comm
Switcher
SETUP MENU
LIVE
System Recording Event
OSD Setup
Monitor 1
Monitor 2
Quick Menu
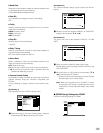
SETUP
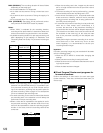
L-UPPER
R-LOWER
WHITE
■
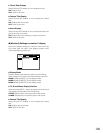
Camera Title
■
Time & Date Display Position
■
Camera Title Display Position
■
Line Color on the Multi Screen
OK CANCEL
CAM8
CAM7
CAM6
CAM5
CAM4
CAM3
CAM2
CAM1
CAM8
CAM7
CAM6
CAM5
CAM4
CAM3
CAM1
ENTRANCE
Advanced
Schedule
Maintenance
Display
Comm
Switcher
SETUP MENU
LIVE
System Recording Event
OSD Setup
Monitor 1
Monitor 2
Quick Menu
SETUP
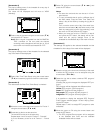
L-UPPER
R-LOWER
WHITE
■
Camera Title
■
Time & Date Display Position
■
Camera Title Display Position
■
Line Color on the Multi Screen
OK CANCEL
CAM16
CAM15
CAM14
CAM13
CAM12
CAM11
CAM10
CAM9
CAM16
CAM15
CAM14
CAM13
CAM12
CAM11
CAM9
CAM10
Advanced