


106
8 Shutdown Time
Select a waiting time before starting the internal processing
against the power outage after an outage detection signal
has been supplied to the unit from the following.
10 s/20 s/30 s/1 min/2 min/3 min/4 min/5 min
8 Auto Copy
ON or OFF whether or not to copy recorded images to the
copy area on the hard disk or a DVD-RAM disk automatical-
ly.
OFF: Does not copy automatically.
COPY1: Copies recorded images to the DVD-RAM disk
connected to the COPY1 port.
COPY1 (ALT): Copies recorded images with an alteration
detection code using the viewer software to the DVD-
RAM disk connected to the COPY1 port.
COPY2: Copies recorded images to the DVD-RAM disk
connected to the COPY2 port.
COPY2 (ALT): Copies recorded images with an alteration
detection code using the viewer software to the DVD-
RAM disk connected to the COPY2 port.
HDD: Copies recorded images to the copy area on the
hard disk of this unit.
Important:
• When OFF is selected, the auto copy function at an
event occurrence and emergency recording will not
function.
• The auto copy will not work if a DVD-RAM disk drive is
not connected even though "COPY 1" or "COPY 2" is
selected.
• Images recorded (by pre-event recording) in the pre-
recording area in the extension unit will not be copied
automatically.
• When emergency recording/event recordings are per-
formed frequently, it may be possible that the auto copy
function does not function.
• Images to be copied automatically will be 30 minute’s
worth of images recorded from the start of emergency
recording/event recording.
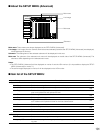
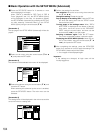
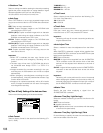
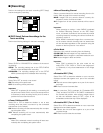
● [Time & Date] Setting of the date and time
Perform the following settings of the time and date.
8 Date Format
Select a display format for the date from the following. (Ex.
April 1, 2004)
YY.MM.DD: 04.4.1
MMM.DD.YY: APR.1.04
DD.MMM.YY: 1.APR.04
8 Time Format
Select a display format for the time from the following. (Ex.
3 o’ clock in the afternoon)
12h: 3:00:00 PM
24h: 15:00:00
8 Time & Date
Adjust the current time and date.
Enter year, month, day, hour, minute and second in order,
move the cursor to "SET" and press the SET button.
Important:
Recording will stop for around 4 seconds just after set-
ting the date and time.
8 Auto Adjust Time
Select a method for auto time adjustment from the follow-
ing.
When "MASTER" is selected, a signal will be supplied from
the ALARM/CONTROL connector as the MASTER time (see
below) at the specified time.
OFF: Does not function.
MASTER: A signal will be supplied from the ALARM/CON-
TROL connector on the rear and the clock of the other
devices will be adjusted with reference to the time of
this unit.
SLAVE: A signal will be supplied to the ALARM/CONTROL
connector on the rear and the clock of this unit will be
adjusted.
Important:
Recording will not be performed for around 4 seconds
when changing the present time (accurate to within ±5
seconds) using the time adjustment input (pin no.20) of
the ALARM/CONTROL connector on the rear panel.
8 Master Time
Specify the time when supplying a signal from the
ALARM/CONTROL connector.
8 Summer Time (Day Light Savings)
Select the method of switching to summer time from the fol-
lowing.
OUT: Does not function.
IN: Applies summer time.
AUTO: Applies summer time in accordance with the setting
of summer time (see below).
8 Summer Time (Day Light Savings) Table
Do the following to specify the start time and date and the
end time and date of summer time.
Schedule
Comm
Switcher
SETUP MENU
LIVE
Recording Event
Display
System
Maintenance
Basic Setup
Time & Date
User Regist.
User Edit
User Delete
Host Regist.
Host Edit
Host Delete
User Level
Save/Load
Quick Menu
MMM.DD.YY
12H
SET
OFF
12 :00 AM
AUTO
SETUP
■
Date Format
■
Time Format
■
Time & Date
■
Auto Adjust Time
Master Time
■
Summer Time(Day Light Savings)
■
Summer Time(Day Light Savings)Table
AM
JAN . 01 . 04 12 00 00
::
Advanced