


45
US
Getting Started
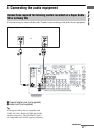
7: Setting up the receiver
using the Easy Setup
You can set the basic settings of the receiver
easily by operating the receiver in accordance
with the instructions on the TV screen.
Switch the input of the TV to the input to
which the receiver is connected.
When you turn on the receiver for the first
time, the EULA screen appears on the TV
screen*. Agree to the EULA to proceed to the
Easy Setup screen, then set up the receiver in
accordance with the instructions on the Easy
Setup screen.
You can set up the following functions using
the Easy Setup.
– Speaker Settings (Auto Calibration)
– Internet Settings
* If the EULA screen does not appear, display the
EULA screen from “EULA” in the System
Settings menu, then confirm and agree to the
EULA.
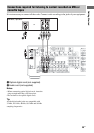
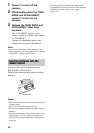
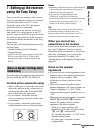
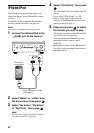
Insert the plug of the optimizer microphone all
the way inside the AUTO CAL MIC jack.
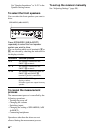
Confirm active subwoofer setup
• When a subwoofer is connected, turn on the
subwoofer and turn up the volume prior to
activating the subwoofer. Turn the LEVEL
knob to just before the mid-point.
• If you connect a subwoofer with the
crossover frequency function, set the value
to maximum.
• If you connect a subwoofer with an auto
standby function, set it to off (deactivated).
Notes
•Depending on the characteristics of the subwoofer
you are using, the setup distance value may be
different from the actual position.
•If you perform “Speaker Settings (Auto
Calibration)” using the Easy Setup, the
measurement results will be overwritten and saved
on the currently selected position (“Pos.1” is
selected as the factory default setting).
Tip
Depending on the position of the subwoofer, the
measurement results for polarity may vary.
However, there will be no problems even if you
continue to use the receiver with that value.
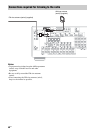
When you connect two
subwoofers to the receiver
If you cannot obtain measurement results of
the “Auto Calibration” function correctly,
depending on the environment, or you want to
make fine adjustments, you can setup the
subwoofers manually. For details, see
“Speaker Setup” in the Speaker Settings menu
(page 94).
Notes on the speaker
impedance
• If you are not sure of the impedances of the
speakers, refer to the operating instructions
supplied with your speakers. (This
information is often on the back of the
speaker.)
• When you connect all speakers with a
nominal impedance of 8 ohms or higher, set
“Speaker Impedance” to “8 Ω.” When
connecting other types of speakers, set it to
“4 Ω.”
• When you connect front speakers to both the
FRONT A and FRONT B terminals,
connect the speakers with a nominal
impedance of 8 ohms or higher.
– When you connect speakers with
impedance of 16 ohms or higher in both
“A” and “B” configuration:
Set “Speaker Impedance” to “8 Ω” in the
Speaker Settings menu.
– For other types of speakers in other
configurations:
Notes on Speaker Settings (Auto
Calibration)
continued