


RQT8926
40
Importing WMA/MP3 from a PC
[WMA] [MP3]
With a network connection (LAN home network), you can save
WMA/MP3 data from your PC in the HDD of this unit.
You can import recordings without any audio distortion or
degradation.
Preparation
1 Connect this unit and the PC to the network (➜ page 20), or
connect this unit and the PC directly (➜ page 90).
2 To display the picture turn on the television and select the
appropriate video input to suit the connections to this unit.
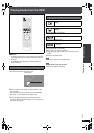
3Press [Í].
4 Press [MUSIC COLLECTION] to switch the selector to
“Music Collection”.
Preparations and items to check on the PC
1 Set the “Shared Folder” (➜ page 41, Setting the “Shared
Folder”), and move the folder containing WMA/MP3 files to
the “Shared Folder”, or move the folder containing WMA/
MP3 files to the “Shared Documents” folder.
≥It is necessary to name the PC and the PC Shared Folder
using only characters that can be used on this unit. If
necessary, make changes to the “Shared Name” and “Full
Computer Name” on the PC.
2 Checking the PC name (Computer name).
e.g., For “Windows XP Home Edition”
From the “Start” menu, select “System” in “Control Panel”,
and click on the “Computer Name” tab, and make note of
the name given in the “Full Computer Name” field.
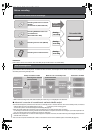
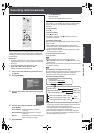
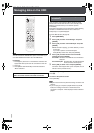
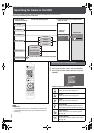
Main unit operations
From the Main Screen (➜ page 30)
1 Press [SUB MENU].
2 Press [34] to select “Import from PC” and press
[ENTER].
3 Press [34] to select “PC Name” and press [ENTER].
4 Enter the PC name (➜ page 69) and press [∫] (Set).
≥Enter the name that you checked in step 2 of
“Preparations and items to check on the PC” (➜ left)
(Up to 15 characters).
If the PC name, etc. is displayed
If you have previously imported data or performed a
backup (➜ page 87), then PC name, etc. may be
displayed. In this case, check the PC name and make any
changes that may be necessary.
5 Repeat steps 3 and 4 and enter other items.
User Name: The user account name used when
Windows XP was registered.
Password: Password set for the user name
≥Passwords will be displayed as “ *************** ”.
Shared Folder: Name of the shared folder on the PC.
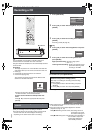
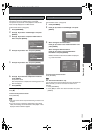
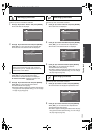
6
Press [
3421
] to select “Import” and press [ENTER].
The list inside the shared folder on the PC will be
displayed.
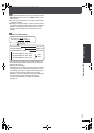
7 Select the folder to be imported with [34] and add a
check mark with [21].
To select all the folders
Press [SUB MENU] and select “Mark All”.
≥To remove the check marks from all the folders, select
“Unmark All”.
8 Press [ENTER].
9 Press [21] to select “Yes” and press [ENTER].
Import starts and the current status and remaining time is
displayed. After importing is finished, the status message
appears.
≥If import does not start, refer to “Messages” (➜ page 98)
to address to any problems.
≥Supported OS: Windows XP SP2
≥File formats that can be imported
–extensions: WMA,MP3
≥MP3 files in compliance with MP3 standards
≥MPEG-1 Audio Layer III
≥MPEG-2 Audio Layer III (LSF)
–compatible bitrate: 32 kbps to 192 kbps
–files without copyright restrictions
≥Tracks can also be Imported from NAS (Network Attached
Storage).
ޓ
D
I
R
E
C
T
N
A
V
I
G
A
T
O
R
O
N
E
T
O
U
C
H
P
L
A
Y
S
T
A
R
T
ޓ
ޓ
ޓ
T
O
P
M
E
N
U
HDD
BAND
FUNCTIONS
MENU PLAYLIST
SELECT
VOLUME
FAVORITE
PLAYMODE
HDDREC
ENERGETIC RELAXINGMELLOW
MUTINGSETUP
SELECT
SOUND
SLEEP
FL DISPLAY
VS
2
ND
EMOTIONAL
REG
SELECT
PLAYPAU SESTOP
CH SELECT
CANCEL
HDD
STOP
CH SELECT
CANCEL
PC Name
User Name
ADGJ
Password
Shared Folder
Import Cancel
F40
Import from PCMusic Collection
ENTER
Cancel
Folder_001 Updating
Not Imported Yet
Not Imported Yet
Import from PCMusic Collection
[LEFT/RIGHT] to check/uncheck
ENTER
Cancel
Folder_002
Folder_004
Import Complete
Folder_003
Import from PCMusic Collection
ENTER
Cancel
No
Yes
1 Folder(s)
1 file(s)
4.58 GB
Do you want to import?
PTX79P.book Page 40 Monday, April 9, 2007 9:24 AM