


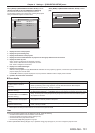

Chapter 4 Settings — [PROJECTOR SETUP] menu
ENGLISH - 97
[L1/L2/L4] Lamp 1, 2, and 4 will light.
[L1/L3/L4] Lamp 1, 3, and 4 will light.
[L2/L3/L4] Lamp 2, 3, and 4 will light.
[SINGLE] One lamp will light. (The lamp with shorter runtime will automatically light.)
[DUAL] Two lamps will light. (The lamps with shorter runtime will automatically light.)
[TRIPLE] Three lamps will light. (The lamps with shorter runtime will automatically light.)
[QUAD] Four lamps will light.
3) Press the <ENTER> button.
Note
f For a certain time after [LAMP SELECT] is switched, [LAMP SELECT] cannot be switched again, because the speed of the lamp
replacement cycle will increase. Repeatedly switching [LAMP SELECT] in a short time will also increase the speed of the lamp replacement
cycle.
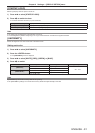
f The colors of the items indicate the status.
Green Current setting
Yellow Current setting (when there is a lamp that cannot turn on or failed to turn on)
Red Lamp that has failed to turn on
White Any other status
f In settings other than [QUAD], when a lamp has gone off or the runtime exceeds 3 000 hours, the lamp is turned off and the other lamp(s)
are turned on. In [QUAD], lamps that have gone off or whose runtime exceed 3 000 hours are turned off, and only lamps whose runtime do
not exceed 3 000 hours are turned on. The projector enters standby mode when the runtime of all lamps exceed 3 000.
f Ensure that lamp units not to be turned on are also installed.
f More lamps than the specied number of lamps light temporarily to prevent decreased illuminance when a lamp is switched.
[LAMP RELAY]
Switch the lamp to be turned on automatically by specifying the day of the week and time.
The degradation of the lamp due to continuous usage can be reduced by automatically switching the lamp to be turned on when using the
projector continuously for a week or more.
1) Press as to select [LAMP RELAY].
2) Press qw to switch the item.
[OFF] Disables lamp relay.
[24H] Switches the lamp daily.
[1WEEK] Switches the lamp weekly.
f When [24H] or [1WEEK] is selected, proceed to Step 3).
3) Press as to select [TIME].
4) Press the <ENTER> button.
f Enters adjustment mode (the display is blinking).
5) Press qw to select “hour” or “minute”, and press as or the number (<0> ‑ <9>) buttons to set a
time.
f Selecting “hour” allows setting of only the hour in increments of one hour, and selecting “minute” allows setting of only the minute in
increments of one minute between 00 and 59.
6) Press the <ENTER> button.
f The adjusted time is established.
f When [1WEEK] is selected in Step 2), proceed to Step 7).
7) Press as to select [DAY OF THE WEEK].
8) Press qw to switch the item.