


Chapter 5 Maintenance — Maintenance/replacement
ENGLISH - 145
Replacing the unit
Air lter unit
If dirt does not come off even after the unit is maintained, it is time for the unit to be replaced.
The Replacement lter unit (Model No.: ET-EMF510) is an optional accessory. To purchase the product, consult your dealer.
Replacing the air lter unit
Attention
f Make sure to turn off the power before replacing the air lter unit.
f When attaching the unit, make sure that the projector is stable, and perform the replacement in a safe place even if you drop it accidentally.
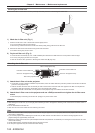
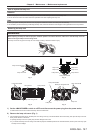
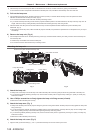
1) Remove the air filter unit.
f Refer to “Removing the air lter unit” (x page 143).
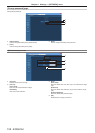
2) Attach the optional Replacement filter unit (Model No.: ET‑EMF510) to the projector.
f The air lter unit has no difference between top and bottom, but is two-sided. Match the protrusion position of the air lter unit with the
grooves on the projector body.
f Refer to “Attaching the air lter unit” (x page 144).
Attention
f When switching on the projector, make sure that the air lter unit is attached. If it is not properly attached, the projector will suck in dirt and
dust causing a malfunction.
f If you use the projector without attaching the air lter unit, the lter indicator <FILTER> blinks in red and the message appears on the
projected image for approximately 30 seconds.
Note
f The replacement cycle of the air lter unit varies greatly depending on the usage environment.
Lamp unit
The lamp unit is a consumable component. Refer to “When to replace the lamp unit” (x page 146) for details about the replacement cycle.
When purchasing the optional Replacement lamp unit (Model No.: ET-LAD510 (1 pc), ET-LAD510F (4 pcs)), consult your dealer.
It is recommended that you request a qualied technician to replace the lamp unit. Consult your dealer.
WARNING
Replace the lamp unit after the lamp has cooled (after waiting at least one hour).
The high temperature inside the cover will cause burns.
Checking the lamp unit to be replaced
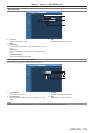
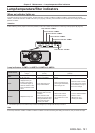
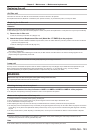
1) Check the status of the lamp indicators <LAMP1>/<LAMP2>/<LAMP3>/<LAMP4> of the projector.
f The lamp unit corresponding to the lamp indicator that is lit in red is required to be replaced.
Notes on the replacement of the lamp unit
f A Phillips screwdriver is necessary when replacing the lamp unit.
f Since the luminous lamp is made of glass, it may burst if dropped or hit with a hard object. Handle with care.
f Do not disassemble or modify the lamp unit.
f When replacing the lamp unit, be sure to hold it by the handle because its surface is pointed and its shape is protruded.
f The lamp may have burst. Replace the lamp unit carefully so the glass fragments of the lamp do not scatter. When the projector is mounted
on the ceiling, do not perform the replacement directly under the lamp unit or put your face near it because the glass fragments of the lamp
may fall.
f The lamp contains mercury. When disposing of used lamp units, contact your local authorities or dealer for correct methods of disposal.
Attention
f Panasonic assumes no responsibility for any damage or malfunction of the product resulting from use of lamp units which are not
manufactured by Panasonic. Use only specied lamp units.
Note
f The model numbers of accessories and optional accessories are subject to change without prior notice.