


Chapter 4 Settings — [ADVANCED MENU] menu
ENGLISH - 79
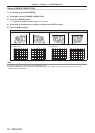
[EDGE BLENDING]
The edge blending function allows multiple projector images to be seamlessly overlapped by using the inclination of the brightness at the
overlapped area.
1) Press as to select [EDGE BLENDING].
2) Press qw to switch the item.
f The items will switch each time you press the button.
[OFF] Sets the edge blending function to off.
[ON] Use the setting value preset in the projector for the inclination of the edge blending area.
[USER]
Use the user-setting value for the inclination of the edge blending area. (Conguration/registration
requires separate software. Consult your dealer.)
f To adjust edge blending, proceed to Step 3).
3) When [ON] or [USER] is selected, press the <ENTER> button.
f The [EDGE BLENDING] screen is displayed.
4) Press as to specify the location to be corrected.
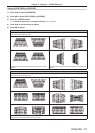
f When joining at top: Set [UPPER] to [ON]
f When joining at bottom: Set [LOWER] to [ON]
f When joining at left: Set [LEFT] to [ON]
f When joining at right: Set [RIGHT] to [ON]
5) Press qw to switch between [ON] and [OFF].
6) Press as to select [START] or [WIDTH].
7) Press qw to adjust the starting position or correction width.
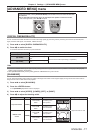
8) Press as to select [MARKER].
9) Press qw to switch to [ON].
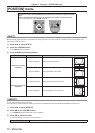
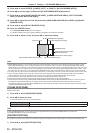
f A marker for image position adjustment is displayed. The position where the red and green lines overlap for the projectors to be joined
will be the optimal point. Make sure to set the correction width for the projectors to be joined with the same value. Optimal joining is not
possible with projectors that have different correction widths.
The optimal point is the point at which these lines overlap.
Green line
Red line
10) Press as to select [BRIGHTNESS ADJUST].
11) Press the <ENTER> button.
f The [BRIGHTNESS ADJUST] screen is displayed.
f By setting [AUTO TESTPATTERN] on the [EDGE BLENDING] screen to [ON], the black test pattern is displayed when you enter the
[BRIGHTNESS ADJUST] screen.
12) Press as to select [NON-OVERLAPPED BLACK LEVEL].
13) Press the <ENTER> button.
f The [NON-OVERLAPPED BLACK LEVEL] screen is displayed.
f If [INTERLOCKED] is set to [OFF], [RED], [GREEN], and [BLUE] can be adjusted individually.
14) Press as to select an item, and press qw to adjust the setting.
f Once the adjustment is completed, press the <MENU> button to return to the [BRIGHTNESS ADJUST] screen.