


Chapter 4 Settings — [DISPLAY OPTION] menu
84 - ENGLISH
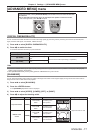
2) Press qw to select [709MODE] or [MEASURED].
3) Press the <ENTER> button.
f The [709MODE] or [MEASURED MODE] screen is displayed.
4) Press as to select [MEASURED DATA].
5) Press the <ENTER> button.
f The [MEASURED DATA] screen is displayed.
6) Measure the current luminance (Y) and the chromaticity coordinates (x, y) using the colorimeter.
7) Press as to select a color, and press qw to adjust the setting.
f Set [AUTO TESTPATTERN] to [ON] to display a test pattern of selected colors.
8) Once all the input is completed, press the <MENU> button.
f The [709MODE] or [MEASURED MODE] screen is displayed.
f When [MEASURED] is selected in Step 2), proceed to Step 9) and enter the coordinates of desired colors.
9) Press as to select [TARGET DATA].
10) Press the <ENTER> button.
f The [TARGET DATA] screen is displayed.
11) Press as to select a color and press qw to input coordinates for desired colors.
f Set [AUTO TESTPATTERN] to [ON] to display a test pattern of selected colors.
12) Once all the input is completed, press the <MENU> button.
Note
f When [709MODE] is selected in [COLOR MATCHING], the ITU-R BT.709 standard three primary colors are set as target data.
f Colors are not displayed properly when target data is a color outside the region of this projector.
f The [709MODE] may differ slightly from the ITU-R BT.709 standard colors.
f Set the [AUTO TESTPATTERN] to [ON] to automatically display a test pattern for use in adjusting the selected adjustment colors.
f Before using a colorimeter or similar instrument to measure measurement data, set [PICTURE MODE] to [DYNAMIC].
f A difference in the color coordinates of target data and measurement values obtained from an instrument may occur for certain instruments
and measurement environments used.
f [AUTO TESTPATTERN] settings change together with the [AUTO TESTPATTERN] of [EDGE BLENDING].
[LARGE SCREEN CORRECTION]
Corrects the phenomenon in which colors that appear lighter when viewed on a large screen viewed from a close distance compared to when
viewed on an average screen size so that colors appear the same.
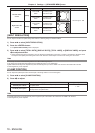
1) Press as to select [LARGE SCREEN CORRECTION].
2) Press qw to switch the item.
[OFF] Performs no correction.
[1] Performs weak correction.
[2] Performs strong correction.
[SCREEN SETTING]
Set the screen size.
Correct to the optimum image position for the set screen when the aspect ratio of a projected image is changed. Set as necessary for the
screen in use.
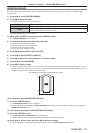
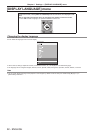
1) Press as to select [SCREEN SETTING].
2) Press the <ENTER> button.
f The [SCREEN SETTING] screen is displayed.
3) Press qw to switch the [SCREEN FORMAT] item.
f The items will switch each time you press the button.
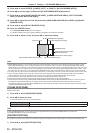
[SCREEN FORMAT] Range when [SCREEN POSITION] is selected
[16:9] Cannot be adjusted.
[4:3] Adjusts the horizontal position between
-
240 and +240.