


Chapter 1 Preparation — Precautions for use
ENGLISH - 19
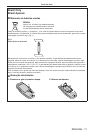
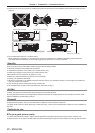
rDo not install and use the projector in portrait setting.
rCautions when setting up the projector
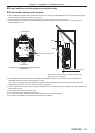
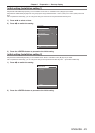
f When installing the projector at the section other than the oor by using the adjustable feet, use six screw holes for ceiling
mount for xing the projector (as shown in the gure).
(Screw diameter: M6, tapping depth inside the projector: 30 mm (1-3/16"), torque: 4 ± 0.5 N·m)
f Make a clearance of at least 5 mm (3/16") between the projector bottom and the setting surface by inserting spacers
(metallic) between them.
Screw holes for ceiling mount
(M6)
Adjustable feet
Clearance (5 mm (3/16") or longer)
Ensure the inflow of air into the air intake port. Otherwise the
projector may not work properly.
Spacer
Mount
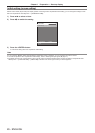
The positions of screw holes for ceiling mount and
adjustable feet
Adjustable feet
f The adjustable feet can be removed if not needed in the installation. However, do not use the screw holes where the
adjustable feet were removed to x the projector in place.
Also, insert only the screws that are specied in the user manual of the optional accessories into the screw holes of the
adjustable feet. Failure to do so may cause damage to the projector.
f Use the adjustable feet only for the oor standing installation and for adjusting the angle. Using them for other purposes may
damage the projector.
f Do not stack projectors on top of each other.
f Do not use the projector supporting it by the top.
f Do not use the projector tilted at an angle that exceeds ±15° from the horizontal plane.
f Do not block the ventilation ports (intake and exhaust) of the projector.