


Chapter 4 Settings — [ADVANCED MENU] menu
80 - ENGLISH
15) Press as to select [UPPER], [LOWER], [LEFT], or [RIGHT] in [BLACK BORDER WIDTH].
16) Press qw to set the region (width) of the [BLACK BORDER WIDTH] adjustment.
17) Press as to select [UPPER KEYSTONE AREA], [LOWER KEYSTONE AREA], [LEFT KEYSTONE
AREA], or [RIGHT KEYSTONE AREA].
18) Press qw to adjust the tilt of the border between [NON‑OVERLAPPED BLACK LEVEL] and [BLACK
BORDER LEVEL].
19) Press as to select [BLACK BORDER LEVEL].
20) Press the <ENTER> button.
f The [BLACK BORDER LEVEL] screen is displayed.
f If [INTERLOCKED] is set to [OFF], [RED], [GREEN], and [BLUE] can be adjusted individually.
21) Press as to select an item, and press qw to adjust the setting.
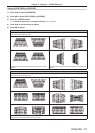
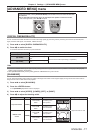
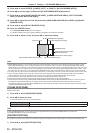
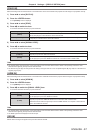
[BLACK BORDER WIDTH] (Right)
Projection range Edge blending [WIDTH] (Right)
[MARKER] (Red)
Edge blending [START] (Right)
([MARKER] (Green))
[BLACK BORDER LEVEL]
[OVERLAPPED BLACK LEVEL] (Right)
[NON-OVERLAPPED BLACK LEVEL]
Note
f [BRIGHTNESS ADJUST] is a function that makes the increased brightness in black level of the overlapping image area difcult to notice
when [EDGE BLENDING] is used to congure multiple screens. The optimal point of correction is set by adjusting [NON-OVERLAPPED
BLACK LEVEL] so the black level of the overlapping image area will be the same level as the non-overlapping area. If the border area of the
part where the image is overlapping and the non-overlapping part gets brighter after adjusting [NON-OVERLAPPED BLACK LEVEL], adjust
the width of the top, bottom, left, or right. Adjust [BLACK BORDER LEVEL] when the width adjustment makes only the border area darker.
f The joining part may look discontinuous depending on the position you are looking from when a screen with high gain or rear screen is used.
f When conguring multiple screens using both horizontal and vertical edge blending, adjust [OVERLAPPED BLACK LEVEL] rst before
making adjustments in Step 12). Adjustment method is same as the procedure of [NON-OVERLAPPED BLACK LEVEL].
f If only horizontal or vertical edge blending is used, set all items in [OVERLAPPED BLACK LEVEL] to 0.
f [AUTO TESTPATTERN] settings change together with the [AUTO TESTPATTERN] of [COLOR MATCHING].
f Adjustment of the tilt of the border between [NON-OVERLAPPED BLACK LEVEL] and [BLACK BORDER LEVEL] is a function to perform
the adjustment of [GEOMETRY] (x page 74) together with the edge blending. If [NON-OVERLAPPED BLACK LEVEL] is tilted by
correcting the keystone from [KEYSTONE] in [GEOMETRY], perform Steps 17) and 18) to adjust the edge blending according to the shape
of [NON-OVERLAPPED BLACK LEVEL].
[FRAME RESPONSE]
Set image frame delay.
1) Press as to select [FRAME RESPONSE].
2) Press qw to switch the item.
f The items will switch each time you press the button.
[NORMAL] Standard setting.
[FAST] Simplies the image processing to reduce image frame delay.
Note
f When [FRAME RESPONSE] is set to [FAST], picture quality deteriorates. Also, [DIGITAL CINEMA REALITY] cannot be set.
f [FRAME RESPONSE] cannot be set during P IN P.
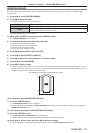
[RASTER POSITION]
This will allow the position of the image to move within the display area arbitrarily when the input image is not using the whole display area.
1) Press as to select [RASTER POSITION].