


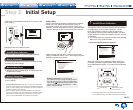
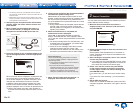


Step 3: Playing Back
En-15
1 Basic Operations
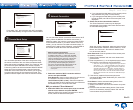
z When using the remote controller to operate
the AV receiver: The remote controller of this unit
has the remote mode function for controlling other
devices. You cannot control this unit when the
remote controller is in the remote mode other than
RECEIVER mode (for controlling this unit). Be sure
to press 3 RECEIVER to select the RECEIVER
mode before starting operation.
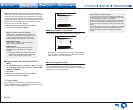
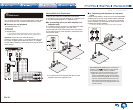
1� Turning the power on�
Press 1 z RECEIVER on the remote controller to turn
the power on.
Switch the input on the TV to that assigned to the
unit. Use the TV's remote controller.
2� Select the input on the unit�
Press the 2 INPUT SELECTOR button for the player
you want to listen to. Press TV to listen to the TV's
sound. You can also use the input selector buttons on
the main unit.
Input will automatically be selected if the TV or player
is CEC compliant and connected to the unit with
HDMI cable.
3� Select the desired listening mode�
After pressing 3 RECEIVER, press the 6 listening
mode buttons to switch the mode so that you can enjoy
different listening modes.
4� Adjust the volume with G VOL�
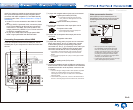
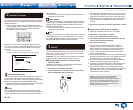
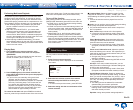
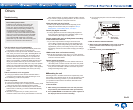
Part names and functions of the remote
controller
1
8
9
F
I
H
G
2
3
4
5
6
7
J
1 z RECEIVER button: Turns the unit on or into standby
mode.
2 REMOTE MODE/INPUT SELECTOR buttons: Switch
the input to be played. Furthermore, by registering a
particular remote control code to a button, you can
switch the remote control mode to operate other
equipment by pressing that button.
3 RECEIVER button: Switches the remote controller to
the mode for operating this unit.
4 Cursor buttons and ENTER button: Move the cursor
and confirms the selection.
5 SETUP button: Displays the screen for making various
settings for this unit.
6 Listening mode buttons: Allow you to select the
listening mode.
MOVIE/TV button: You can select a listening mode
suitable for movies and TV programs.
MUSIC button: You can select a listening mode suitable
for music.
GAME button: You can select a listening mode suitable
for games.
STEREO button: You can select a listening mode for
stereo and all channel stereo sources.
For details on the listening modes, see the Advanced
Manual.
7 DIMMER button: Switches the brightness of the display.
8 ZONE2 button: For use when the unit is connected with
a pre-main amplifier or speakers in a separate room and
sound is played there.
9 MUSIC OPT button: Turns on/off the MUSIC
OPTIMIZER function that improves the quality of the
compressed audio.
F MUTING button: Temporarily mutes audio. Press again
to cancel muting.
G VOLUME buttons: Allow you to adjust the volume. This
button also cancels the muting.
H RETURN button: Returns the display to the previous
state.
I Q button: Displays the Quick Setup menu that allows
you to quickly access the frequently used setting items
including sound quality adjustment.
J DISPLAY button: Switches the information on the
display.