


62
You must first engage this feature by pressing enter, then volume ± to toggle
DISABLED to ENABLED. This enables a menu that in turn has several
submenus, examples of which are shown below:
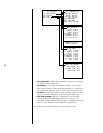
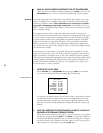
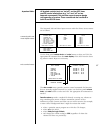
SURROUND MODE DEFAULTS
DEFAULTS: ENABLED
DOLBY DIGITAL
DTS
MPEG
2-CH/SURROUND OFF
DOLBY PRO LOGIC
↓ PRO LOGIC + THX
PRO LOGIC II MOVIE
PRO LOGIC II + THX
PRO LOGIC II MUSIC
STEREO SURROUND
MONO SURROUND
MONO CENTER ONLY
MONO FRONTS
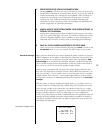
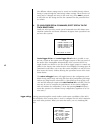
DOLBY DIGITAL
CENTER: 0.0
SURROUNDS: 3.0
BACKS: 3.0
SUB: 3.0
SUB MODE: FORCE ON
THX: ON
STEREO SURROUND
CENTER: 0.0
SURROUNDS: 0.0
BACKS: 0.0
SUB: 0.0
SUB MODE: FORCE ON
This extra step ensures that any automated changes of output levels are
consciously chosen and therefore less likely to cause surprises. It also allows
you to disable all the surround mode defaults in one easy step, should you
decide at some future date to return to the calibrated settings for all your
routine listening.
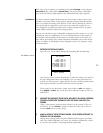
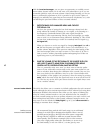
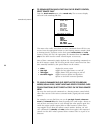
2 SELECT THE SURROUND MODE YOU WOULD LIKE TO MODIFY
For example, when you have selected the Dolby Digital mode, you might
see a screen that looks something like this:
DOLBY DIGITAL
CENTER: 0.0
SURROUNDS: 0.0
BACKS: 0.0
SUB: 0.0
SUB MODE: FORCE ON
THX: ON
Other surround modes may have fewer items, since only those adjustments
that are appropriate to a given surround mode are displayed. Thus, (for ex-
ample) center, surrounds and backs are omitted on 2-ch/surround off.
3 ADJUST THE LEVEL OF CENTER, REAR AND SUB CHANNELS RELATIVE TO
THE FRONT LEFT AND RIGHT SPEAKERS TO SUIT YOUR PREFERENCE
Using the volume ± buttons, move the cursor to the item you wish to ad-
just; press enter; then adjust the setting with the volume ± buttons. Save
each setting as you go along by pressing enter.