


31
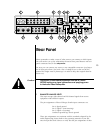
18 VIDEO OUTPUTS
The AVP2 includes a total of four composite video outputs and two S-video
outputs. One of each is used for the main outputs to your display device;
the rest are available for either remote zone or recording applications. Any
combination of the available outputs may be used.
For your convenience, conversion from S-video to composite is provided on
both the main and the record/remote paths. Thus S-video sources may be
viewed via either the S-video or the composite outputs; composite sources
are only available on the composite output. (They will display in black and
white on the S-video output.)
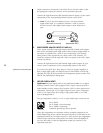
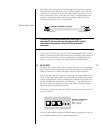
Composite video outputs use RCA connectors. S-video outputs utilize “S”
connectors:
S-video connector
The
main output (either or both composite and S-video, depending on
what you need to use) should be connected to your video monitor in the
main home theater system.
The record/remote outputs can be used to feed video signals to another
system elsewhere in the house, or for making recordings on VCRs, much as
you would make audio cassette recordings with a traditional preamplifier or
receiver. Connect them to the corresponding inputs on the back of those
video tape recorders.
Installation Note: S-video (Y/C) signals are more susceptible to degradation
over long wire runs. The quality of wire used makes a
significant difference, but regardless, it is generally
inadvisable to run S-video cables more than twenty feet (6
meters). Composite video signals hold up better over longer
runs, especially when high quality 75
Ω
cable such as
Madrigal MDC-2 is used. Therefore we strongly suggest you
use a composite to run video to a remote zone, and save the
S-video output for a local S-capable VCR.
19 ~AC MAINS INPUT
The latching AC power switch on the front panel disconnects the AVP2
from the wall outlet’s AC power. Check to ensure that the power switch is
disengaged (protruding from the front panel), then plug the supplied three-
prong power cord into the AC mains receptacle before plugging the power
cord into the wall. (If a longer AC power cord is required for your applica-
tion, be sure to use a three-conductor power cord which conforms to IEC
standards.) Once the connections are all firmly made, switch on power at
the front panel. After a few moments to initialize, the AVP2 will be ready for
use.
The AVP2 is designed to be left in Standby when not in use, rather than
completely “off.” Being in Standby allows it to respond to commands from
the remote control and maintains a stable operating temperature at all
times for optimal performance and longevity.