


45
To take a common but surprisingly complex example, imagine:
• that you have a laserdisc player that has an RF Dolby Digital
(AC-3) output, a digital output, and analog outputs;
• that you usually listen to it in THX cinema mode, whether using
discrete digital soundtracks or Dolby Pro Logic soundtracks;
• and that you prefer to use a subwoofer for movies for the extra
impact, but prefer not to use it when listening to music.
The
setup menu is where you “explain” all this to the AVP2, so that all you have
to do when you want to watch a laserdisc is press a single button. The system
can easily do everything else for you. It even figures out which of the three con-
nections (AC-3, normal digital, and analog) it needs to use without you having to
read the fine print on the back of the laserdisc jacket.
We’ll take each of the submenus in turn.
define source buttons Each of the buttons on the on the top row of the front of the AVP2 may be asso-
ciated with any of the audio and video connectors on the rear of the AVP2. In
fact, each button can be associated with a maximum of three audio connections
(the AC-3 RF input if you have the RF demodulator, plus a digital input, plus a set
of analog inputs on the AVP2), and one video connection.
The reason for this extraordinary flexibility is that we want you to be able to use
the button that makes sense for each component, regardless of the type of con-
nector it may require. By manually associating whatever connector you need to
use with the button you want to use, you can make the system work the way
you want it to work.
Moreover, we feel the system should handle the day-to-day details of sorting out
RF AC-3, digital and analog soundtracks for you, rather than you having to read
the fine print on each disc you own. By assigning more than one connector to a
given button (as needed), the system can search for a usable signal rather than
making you do it, according to the list you give it during setup.
Thus, we give you a scrolling list of all ten input buttons, and give you the op-
portunity to tell the AVP2 which connectors you would like it to use when you
press that button. Your first connector is also your “first choice,” the priority con-
nection; second choice is second priority; and third connector selection is the
“last resort.” (That is, when there is nothing to listen to on the first and second
choices.)
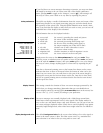
example: setting up
a cd transport
A couple examples will help. With a simple CD transport, you might set up your
default selections as follows: