


32
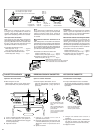
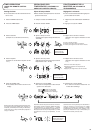
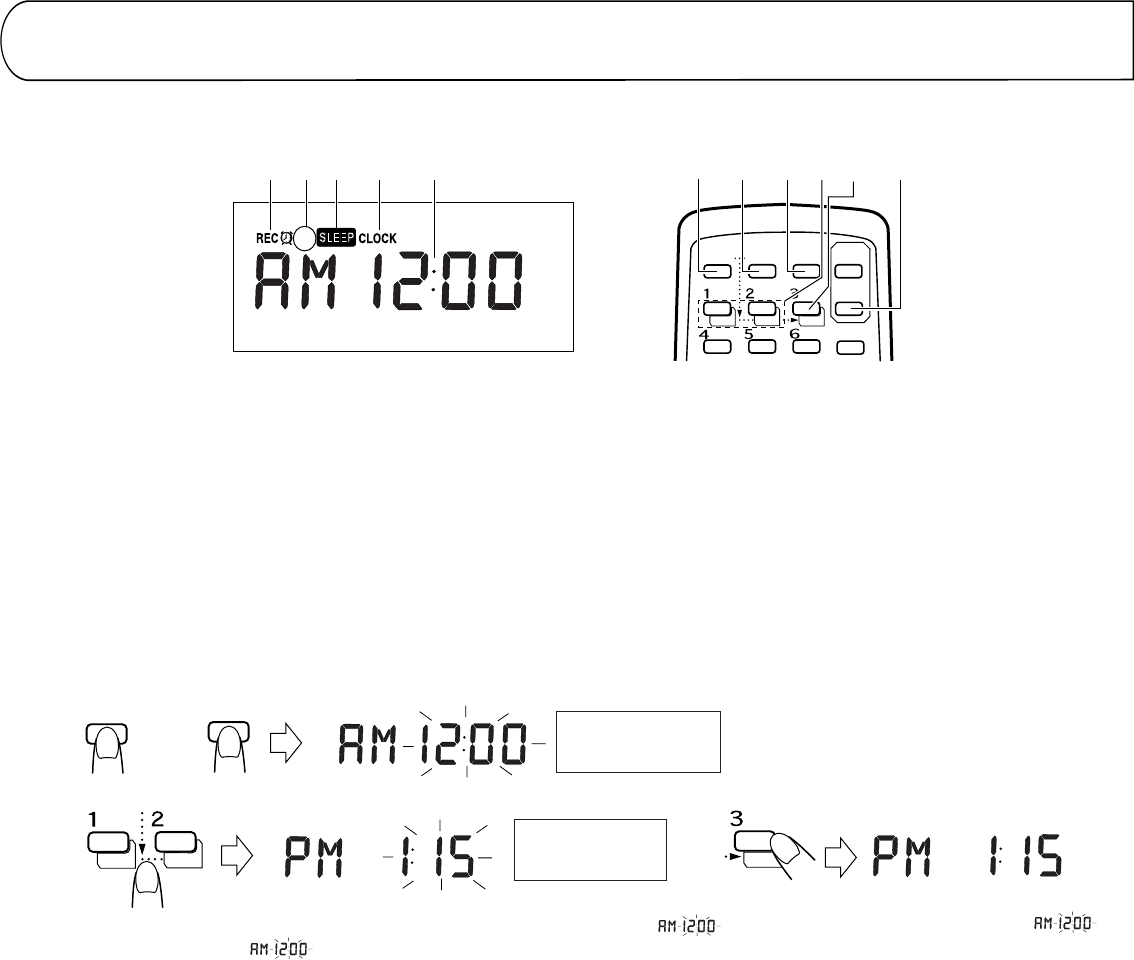
1 Set the POWER button to ON.
2 Press the CLOCK button; “ ” will
blink in the display.
3 Set to PM 1:15 by pressing the DOWN/UP
buttons.
(When the button is kept pressed, the minute/
hour indication changes continuously.)
4 Press the SET button; the time will light in
the display.
÷ Each time the hour’s digits change from 11 to
12, the display alternates between AM and
PM. (12 midnight is indicated as “AM 12:00”
and 12 noon is indicated as “PM 12:00”.)
÷ To set to the nearest second...
Press the SET button when you hear the time
signal from a TV or radio.
÷ To confirm the time while listening to a CD
or radio broadcast
Press the DISPLAY button briefly on the
remote control unit. Press it again to return to
the previous display.
Notes:
÷ Before performing timer recording or playback,
it is necessary to set the current time.
÷ If memory back-up batteries are exhausted
or not installed, and the power cord is plugged
in again after being disconnected, or power is
restored after a power failure, “CLOCK” will
blink in the display. Set the current time again.
÷ Confirmación de la hora mientras escucha
un CD o un programa de radio
Presione brevemente el botón DISPLAY del
control remoto. Presiónelo otra vez para volver
a la indicación anterior.
Notas:
÷ Antes de efectuar la grabación o reproducción
por temporizador, es necesario ajustar la hora
actual.
÷ Si las pilas de apoyo de memoria están
agotadas o no están colocadas, y el cable
de alimentación es enchufado otra vez
después de desconectarlo, o se restaura el
suministro eléctrico después de un corte,
“CLOCK” parpadeará en la indicación. Ajuste
la hora otra vez.
÷ Pour confirmer l’heure tout en écoutant un
CD ou une émission radio
Appuyer briévement sur la touche DISPLAY
de la télécommande. La presser de nouveau
pour revenir à l’affichage précédent.
Remarques:
÷
Avant d’effectuer l’enregistrement ou la lecture
par minuterie, il est nécessaire de régler
l’heure actuelle.
÷
Si les piles de soutien mémoire sont épuisées
ou non installées, et que le cordon
d’alimentation est rebranché après avoir été
débranché, ou si l’alimentation est restituée
après une panne de courant, “CLOCK”
clignotera dans l’affichage. Régler de nouveau
l’heure courante.
1
Régler la touche POWER sur marche.
2
Appuyer sur la touche CLOCK; “- ”
clignotera dans l’affichage.
3
Régler sur PM 1:15 en pressant les touches
DOWN/UP.
(Si la touche est maintenue pressée, l’indication
des minutes/heures évolue en continu.)
4
Appuyer sur la touche SET; l’heure sera
allumée dans l’affichage.
÷
Chaque fois que les chiffres des heures
passent de 11 à 12, l’affichage alterne entre
AM et PM. (Minuit est indiqué sous la forme
“AM 12:00” et midi sous la forme “PM 12:00”.)
÷
Pour régler à la seconde près...
Appuyer sur la touche SET au moment d’un
signal horaire de la télévision ou de la radio.
1 Coloque el botón POWER en ON.
2 Presione el botón CLOCK; “ ”
parpadeará en el visor.
3 Ajuste a la 1:15 PM presionando los botones
DOWN/UP.
(Si mantiene el botón presionado, la
indicación de los minutos/hora cambia
continuamente.)
4 Presione el botón SET; la hora se iluminará
en el visor.
÷ Cada vez que los dígitos de la hora cambian
de 11 a 12, la indicación conmuta entre AM y
PM. (las 12 de la noche es indicada como
“AM 12:00” y las 12 del día es indicada como
“PM12:00”.)
÷ Para fijar los segundos en forma más exacta...
Presione el botón SET al escuchar la señal
horaria de la televisión o la radio.
Setting the current time (when this unit
is used for the first time)
(Example: To set the clock to PM 1:15.)
Ajuste de la hora actual (cuando se usa
la unidad por primera vez)
(Ejemplo: Para ajustar el reloj a las 1:15 PM.)
Réglage de l’heure actuelle (quand cet
appareil est utilisé pour la première fois)
(Exemple: Pour régler l’horloge à PM 1:15.)
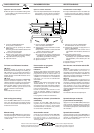
CLOCK ADJUSTMENT
(USING THE REMOTE CONTROL
UNIT)
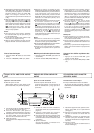
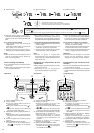
Names of parts in the clock/timer section,
and their functions:
AJUSTE DEL RELOJ
(UTILIZANDO LA UNIDAD DE
CONTROL REMOTO)
Nombre de las parte de la sección del reloj/
temporizador y sus funciones:
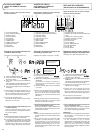
1 Timer mode indicator
2 Timer indicator (ON/OFF)
3 SLEEP indicator
4 CLOCK indicator
5 Time display
6 CLOCK button
7 TIMER button
8 TIMER ON/OFF button
9 DOWN/UP buttons
p SET button
q SLEEP button
1 Indicador del modo temporizador
2 Indicador del temporizador (ON/OFF)
3 Indicador SLEEP
4 Indicador CLOCK
5 Indicación de la hora
6 Botón CLOCK
7 Botón TIMER
8 Botón TIMER ON/OFF
9 Botón DOWN/UP
p Botón SET
q Botón SLEEP
1
Indicateur de mode de minuterie
2
Indicateur de marche/arrêt de minuterie (ON/
OFF)
3
Indicateur de sommeil (SLEEP)
4
Indicateur d’horloge (CLOCK)
5
Affichage de l’heure
6
Touche CLOCK
7
Touche TIMER
8
Touche TIMER ON/OFF
9
Touche DOWN/UP
p
Touche SET
q
Touche SLEEP
Noms des pièces dans la section horloge/
minuterie, et leurs fonctions:
ON
OFF
1
2
3
54
SLEEP
POWER
CLOCK TIMER
TIMER
ON/OFF
PROGRAM
DOWN UP SET
(AC)
q
9
p
786
12
3
4
POWER
CLOCK
DOWN UP
SET
(AC)
Within 2 minutes.
Dentro de 2 minutos.
Dans 2 minutes.
Within 2 minutes.
Dentro de 2 minutos.
Dans 2 minutes.
REGLAGE DE L’HORLOGE
(EN UTILISANT LA TELECOMMANDE)