


Wolf Cinema Owner's Manual
3-1
SECTION 3
This section explains how to effectively operate the projector once it has been installed. It is
recommended that you read this section and familiarize yourself with the components and the
availablemenuoptionsbeforeyoubeginusingyourprojectorforthersttime.
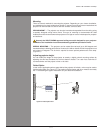
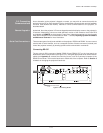
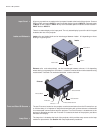
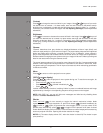
The built-in keypad is located at the back of the projector, beside the input panel. Use it similarly
to the IR remote to control the projector. A status LED display is also included on this keypad for
monitoring projector status.
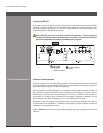
The AC receptacle is located at the back of the projector just below the input panel. Use this
outlet to plug in an appropriately rated power cord. Refer to Section 6 — Specications for
details.
Located on the underside and on top, with the (i) models, of the projector are two fully adjustable
feet. Raise or lower these feet when positioning the projector to ensure it is level on all sides so
the displayed image will appear rectangular without any keystone.
NOTE: The third foot, located at the rear of the projector (underside) is not adjustable.
Refer to Section 2 - Projector Position and Mounting for instructions on how to adjust the
projector’s feet.
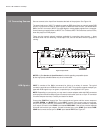
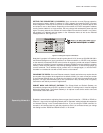
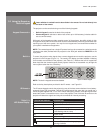
The projector is built with a motorized lens mount that allows for easy lens control and
adjustment. This includes such functions as adjusting vertical and horizontal offsets, zoom and
focus.Thelensmountcanbettedwithanyoneoftheavailableoptionallenses–seeSection
6 — Specications.
Zoom and Focus• — There are two internal lens motors that allow for quick motorized
adjustmentofzoomandfocus.Adjustzoomtotthedisplayedimageonthescreenand
adjust focus to improve the clarity of the image.
Lens Offset • — Vertical and horizontal offset is performed on the lens mount through the use
of DC motors.
Shutter• — Standard on all models the shutter allows you to turn the screen absolutely black
when in the “on” state. Press the ‘mute’ button for 1-2 seconds on the remote to operate the
shutter.
IRIS • — Enables adjustment of light output and contrast ratio.
NOTES: Use the lens cap when transporting the projector to avoid scratching and damaging the
lens, which could affect your displayed image.
Built-in Keypad >
AC Receptacle >
Adjustable Feet >
OPERATION
3.1 About the Projector
Lens Mount & >
Projection Lenses
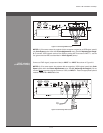
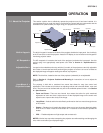
Iso - Rear Left View
Iso - Front Right View
Rear View
Top View
Side - Left View
Side - Right View
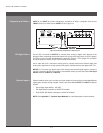
Iso - Rear Left View
Iso - Front Right View
Rear View
Top View
Side - Left View
Side - Right View
Top
Projection Lens
Front IR Sensor
Adjustable Feet (4)
Exhaust
AC Receptacle
Lamp Door
Input Panel
Built-in Keypad
Rear IR Sensor
Status LED Display
Intake