


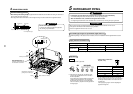

33
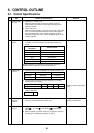
New check code
1. Difference between the new check code and the current system
The displaying method of the check code will change from this model onwards.
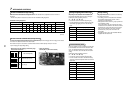
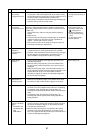
Display on wired remote controller
• [ ] goes on.
• [UNIT No.] + Check code + Operation lamp (Green) flash
Display on sensor part of wireless remote controller
• Block display will show a combination of
[
] [ ] [ ] symbols.
Display on 7-segment in outdoor unit
• Unit No. and check code are displayed.
• In case of error the auxiliary code, check code and sub-code
are displayed alternately.
2. Special mention
• When the air conditioner stops and the error is cleared, the check code display on the remote controller will also
disappear.
However, if the error continues after the unit has been stopped, the check code will immediately be displayed
when the unit is restarted.
→
9
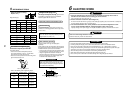
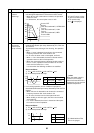
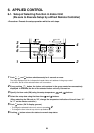
TROUBLESHOOTING
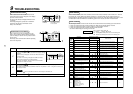
Used characters
Characteristics of code classification
Block display
New check code
Alphabet + Decimal notation, 2 digits
Many classification of communication/incorrect setup system
Communication/Incorrect setup (4-ways), Indoor protection, Outdoor protection,
Sensor, Compressor protection, etc.
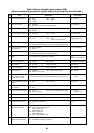
Display
A
C
E
F
H
J
L
P
Classification
Unused
Central control system error
Communication system error
Each sensor error (Failure)
Compressor protective system error
Unused
Setup error, Other errors
Protective device operation
10
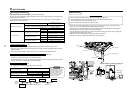
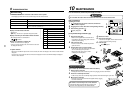
MAINTENANCE
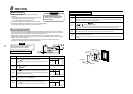
Prior to maintenance, ensure the power supply is turned off.
CAUTION
Do not handle the buttons with wet hands as this will cause the risk of electric shock.
Daily maintenance
Cleaning of air filter
1
If is displayed on the remote controller, maintenance
to the air filter is required.
2
Clogging of the air filter decreases cooling/heating efficiency.
3
After cleaning, push the
FILTER
RESET
.
display disappears.
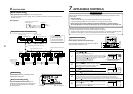
[4-way Air Discharge Cassette Type]
1
2
5
1,
2
3
ON / OFF
FAN
TEMP.
SWING/FIXTIME
MODE
VENT
UNITSET CL
FILTER
RESET
TEST
TIMER SET
CODE No.
Cleaning of air outlet flap
The air outlet flap can be removed to clean if necessary.
1
Remove the air outlet flap.
• Holding both ends of the air outlet flap, remove it by sagging the center downwards.
2
Clean the air outlet flap with water.
• If dirt is heavy, clean the air outlet flap using tepid water with neutral detergent or just water.
3
Mount the air outlet flap.
• First push in the one side, and insert the opposite side by sagging
the center downwards.
Be careful to insert the flap in the correct direction.
Insert the flap with the printed mark facing upwards, and
the arrow on the flap pointing in the outward direction.
1
Open the air inlet grille.
• Slide the air inlet grille buttons to detach the air
inlet grille from the main ceiling panel. Lower the
grille slowly while holding.
2
Take out the air filter.
• Push the extrusion of the air filter away from the
grille and remove.
3
Cleaning with water or vacuum cleaner
• If dirt is heavy, clean the air filter using tepid water
with a neutral detergent or just water.
• After cleaning with water, dry the air filter
sufficiently in a shaded place.
4
Mount the air filter.
5
Close the air inlet grille.
• Close the air inlet grille, slide the button to locate
into the ceiling panel fixing securely.
6
Push the
FILTER
RESET
.
• display disappears.
1
2
3
3
Air inlet grille
Button
Strap to
prevent falling
Air filter
Push
Air inlet grille
Button
1
Insert
2
Insert in the flap sagging
down the center downward.