


7
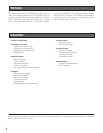
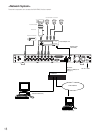
MAJOR OPERATING CONTROLS AND THEIR FUNCTIONS
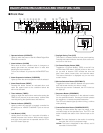
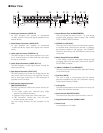
■ Front View
OPERATE
ALARM
SUSPEND
RESET
HDD
FULL
ERROR
OSD
MULTISCREEN
SELECT
ZOOM
TIMER DST
REMOTE
LOCK
SEQUENCE
ALARM
SERCH
STOP
PLAY MODE SELECT
SETUP
/ESC
PLAY
TIME&DATE
SEARCH
REC STOP
SPOT
MULTI
CAMERA SELECT
ALARM
RECALL
REC
PUSH— PAUSE
SET
Digital Disk Recorder WJ-HD200
1
5
2
6
3
7
4
8
q
w e
r u o !1 !5
t
y
i !0
!2
!3 !4 !8 !9
!7 @0
@2@1 @3!6 @4 @5
@6 @7
q Operate Indicator (OPERATE)
Lights up when the power of the WJ-HD200 Digital Disk
Recorder is turned on.
w Alarm Indicator (ALARM)
Blinks when an alarm condition exists. It changes to a
steady light when the activated alarm is reset after
elapsing the auto-reset time.
To turn the indicator off, press the ALARM RESET but-
ton.
e Alarm Suspension Indicator (SUSPEND)
Lights up when the alarm suspension mode is selected.
r Alarm Reset Button (RESET)
Pressing this button cancels an activated alarm, and
return the system back to the conditions before the
alarm was activated.
t Timer Indicator (TIMER)
Lights up when the internal timer works after setting the
TIMER to INT (internal) in the menu setup. It blinks while
recording during the specified start and end time.
y Remote Indicator (REMOTE)
Lights up when the recorder is remotely controlled via
the serial port or 10BASE-T/100BASE-T port on the rear
panel.
u Lock Button (LOCK)
Holding down the button for 2 seconds will enable or
disable the button lock function. While locked, the but-
tons at the front panel are not operable and the LED in
the LOCK button lights up.
i Daylight Saving Time (DST)
The button is recessed inside the front panel opening.
Pressing this button shifts the internal clock to the sum-
mer time or vice versa.
o On Screen Display Button (OSD)
Toggles the “on screen display” (OSD) on and off. You
can eliminate OSD when it veils the portion on the moni-
tor you wish to observe. OSD includes the time and
date, alarm status, camera title, and recorder status.
The status information is displayed only on the multi-
screen monitor.
!0 Monitor Selection Button (SPOT/MULTI)
Toggles the monitor selection between the spot monitor
and multi-screen monitor you wish to control.
When the spot monitor is selected, the LED in the but-
ton lights up.
!1 Sequence Button (SEQUENCE)
Runs the assigned sequence on the selected monitor
for the specified duration. Pressing this button pauses
the sequence, or restarts the paused sequence.
The LED in the button lights up when running, or blinks
when pausing.
!2 Camera Selection Button (CAMERA SELECT)
Pressing a button selects the input live image, or the
recorded image of the specified input. The LED in the
button indicates the status of the camera input as fol-
lows.
Green: The input displayed on the monitor is not being
recorded, but is a live or playback image.
Yellow: The input is displayed on the monitor, and is
recorded on the hard disk.