Installing a CD-Writer Plus in an Empty Drive Bay 1-11
Chapter 1: Installing CD-
Writer Plus and Software
The IDE connectors may be hidden by some of the computer’s cables or
may be behind a drive.
Many computers have an IDE hard drive or CD-ROM that connects to
the motherboard through an IDE controller. The data cables on these
drives have the same width as the data cable included with your CD-
Writer Plus. If your computer has an IDE hard drive or CD-ROM drive,
you can follow the data cable from the back of one of those drives and
find the IDE controller that connects it to the motherboard.
Computer manufacturers use a wide variety of labels for IDE connectors!
Look on your computer’s circuit boards for printing identifying the
primary and secondary connectors, such as:
- PRI and SEC
- IDE-0 and IDE-1
- IDE-1 and IDE-2
- HD and CD-ROM (most common devices to be attached)
- PCI-IDE and ISA-IDE
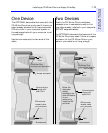
13A. Refer to the Install Recommendation Printout (see page 1-4) to see if you
will have one or two devices connected to the data cable.
On page 1-13 you can see what a One Device installation looks like
compared to a Two Device installation.
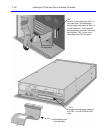
14A. Make the necessary data cable connections for your system.
CAUTION: Do not attach the CD-Writer Plus drive to a sound board’s IDE
controller.
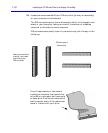
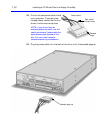
Most data cable connectors are keyed to fit only one way. If your
connector is not keyed to fit only one way make sure the cable’s colored
edge is aligned with PIN-1 where it connects to the CD-Writer Plus drive
and where it connects to the IDE controller on the motherboard. Among
the labels you may find that identify PIN-1 on the motherboard are PIN1,
1 or a small triangle pointing to the pin.
CAUTION: Make sure that you are attaching the cable correctly! You must
locate PIN-1 on each connector and attach the cable so that the edge with the
color stripe is aligned with PIN-1. If the cable is attached incorrectly, your
computer may not boot up.


