


System Installation
19
Signature 2.0
System Installation
The Signature 2.0 is a powerful audio controller that
delivers high-quality sound in a variety of multichannel
modes from a wide range of input sources. Although
many aspects of the 2.0 resemble familiar audio
components, the flexibility and range of control the 2.0
offers means that some steps in the installation process
may be a bit different from traditional analog-only audio
products. For that reason, it is important that you read
the following section carefully even if you are familiar
with audio systems.
As a safety note, it is always good practice to make
certain that the 2.0 and all equipment being installed
and connected to it be turned off and unplugged from
AC-power sources. This prevents the possibility of
accidentally sending any audio or control signals through
the system that may damage your equipment.
We also recommend that you use high-quality cables
when making connections to external audio and video
equipment. There are many brands of cables to choose
from, and we suggest that you consult with your dealer
to select the cables that suit your needs and budget.
After unpacking the unit, and placing it on a solid surface
capable of supporting the weight, you will need to make
the connections to your audio and video equipment. The
following steps need to be done only when the 2.0 is
first installed, or when a change is made to the input
source equipment.
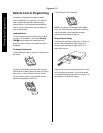
Input Connections
Unlike traditional audio/video products, which have
fixed source inputs assigned to specific products or
sources (e.g., “VCR” or “CD”), the Signature 2.0 allows
you to connect inputs from a variety of audio and video
sources, and then assign them to custom tailored source
“profiles” as you desire. The following instructions will
guide you to making the individual connections, while
the actual assignment of the sources is explained in the
section of this manual covering the Sources Menu on
page 27.
When making audio/video connections it is a good idea
to note the connection points on the User Worksheet
provided in Appendix B.
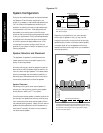
For simple installations, connect your audio and video
sources according to the chart on page 6.
Audio Inputs
The 2.0 accepts inputs from conventional analog audio
products and both coaxial digital and optical digital audio
sources. The flexibility of the 2.0’s profile system allows
you to connect both analog and digital outputs from the
same source (such as DVD, a laser disc player or a Digital
Television adapter) and then associate that source with
any video input or source name.
In addition, the 2.0 will decode PCM digital signals,
Dolby Digital (AC-3*) data and DTS. PCM digital is used
by conventional CD players or the standard digital output
of a laser disc player, while Dolby Digital is used by DVD
players as well as high-definition television sets (HDTV),
many new computer games and other future digital audio
devices. DTS is another digital audio format, used for both
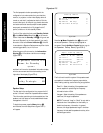
audio-only discs as well as DVDs and laser discs. When a
digital source is selected, the 2.0 will automatically test the
digital data. If the surround mode in use is not compatible
with the digital data input, the mode name will flash in
the front panel
Information Display
(see figure FPD-12
on page 40) alerting you to the error. Pressing the
Display
button
x
will give you an alternate mode selection.
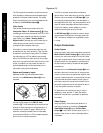
Audio input connections are made in conventional
left/right pairs to the
Analog Audio Inputs ™
and either optical or coax connections to
Optical
or
Coax Digital Audio Inputs ‡ °
. When making
connections, be certain to note the equipment connected
to each input using the chart in Appendix B.
IMPORTANT NOTE: Do not make connections
from the “RF” output of a laser disc player directly to
the 2.0. The RF signal must first be demodulated by an
optional, external device, which is then connected to
the 2.0 via a datastream digital connection. Improper
connections to an RF digital source may result in
damage to your equipment.