


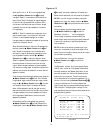

Advanced Setup
33
Signature 2.0
Advanced Setup
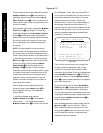
The Signature 2.0 is among the most flexible audio/video
products available. The true power of the 2.0, however,
is in the way that flexibility is harnessed through easy-
to-use on-screen menus and a simple installation and
configuration process. Intensive research by Harman
Kardon has helped establish the factory settings for many
of the 2.0’s options so that they need not be adjusted by
most users.
However, for the advanced audiophile, or where special
system installations require changes to the factory
settings, the 2.0 provides a means to adjust settings that
do not normally need any change. The following section
describes those changes. You may wish to review it now,
or proceed directly to the section of the Manual that
describes the day-to-day operation of the 2.0. Should
you find that some of these settings need adjustment
at a later date, you may always make them without
impairing the enjoyment of your initial listening sessions.
If you do not need to change the 2.0’s initial turn-on
volume level, power-up state, the brightness of the front
panel display, the timing for the on-screen messages, the
menu background or the system video format, turn to
page 37 to find the 2.0’s operating instructions. If you do
wish to change any of these items, look for the instruc-
tions in this section.
Turn-On Volume
The 2.0’s electronic volume control differs from traditional
mechanical volume controls in that there is no visible indi-
cation of the unit’s volume when it is not turned on. Thus,
it is possible the last person to use the 2.0 may leave it set
at a higher volume level than you expect when the system
is turned on again. To prevent against damage to speakers
or complaints from the neighbors, the 2.0 is factory preset
to turn on at a level of 10.
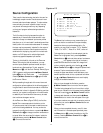
If you wish to change that setting, press the
Menu
button
j
to display the
Setup Menu
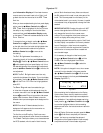
(Figure
OSD-4), and press the
¤ Menu Control
button
i
until
Advanced Setup >
is highlighted. Press
the
Menu
button again to display the
Advanced
Settings Menu
(Figure OSD-10).
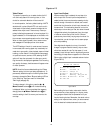
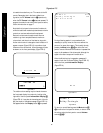
Figure OSD-10
The first item on the menu is the
Turn On Vol
setting. Press the
‹
and
› Menu Control
buttons
i
until the desired volume level is heard.
IMPORTANT NOTE: Do not use the regular volume
controls to make the adjustments for this setting, as
those controls do not alter the memorized settings.
When your new turn-on volume level is reached, press
the
Menu
button
j
to return to the main
Setup
Menu
or twice to exit the menu system.
Power-Up State
This setting enables you to control the manner in which
the 2.0 turns on when power is applied using either the
Master Power Switch 1
, or by plugging in the
AC
Power Cord ‚
while the
Master Power Switch 1
is in the “ON” position.
If you plan to control the 2.0 using optional, external
power sense equipment, or live in an area where there are
frequent power interruptions, you may wish to make an
adjustment to this setting. In normal operation, however,
the setting should be left at the factory preset position.
The settings for this option do not have any impact on
normal operation when the unit is turned on from the
Standby mode with either the
Standby Switch 2
on
the front panel or the
Main Power Switch a
on the
remote. Again, they only determine the state for the 2.0
when power is applied after it is interrupted by a power
failure, by removing the power cord or turning the unit
off with the
Master Power Switch 1
.
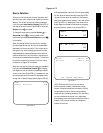
The following options are available:
Current
:
When this option is selected, the 2.0
will return to the state it was in when power was
Advanced Settings
Turn On Vol: 10
Pwr Up State: On
System Control: Lstn
Unit ID: 1
Display Options >
System Reset >