


Page 40
Page 41
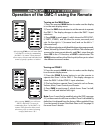
NOTE: you can quit the OSD at any time by pressing EXIT on
the remote. Any changes you make will be saved. There is no
need to navigate back through previous pages, unless you
want to make more changes.
When the OSD is active, the DMC-1 front panel display
shows an abbreviated message of where you currently
are in the menus.
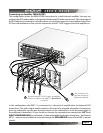
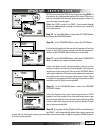
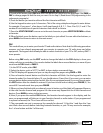
Step 15 - In the MAIN Menu, select the SETTINGS Menu,
and then the SPEAKERS Menu.
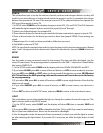
Step 16 - In the SPEAKERS Menu, select the SIZE Menu.
Use the joystick pad to set the size of each speaker to Small or
Large, or set to OFF for those speakers which are not present.
Return to the SPEAKERS Menu when you are nished.
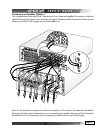
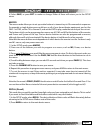
Step 17 - In the SPEAKERS Menu, select the CALIBRATION
Menu to adjust the output of each speaker.
A test noise plays in each selected speaker, and you use the
remote to adjust the volume of each speaker until they are
all playing at the same level. Return to the SPEAKERS Menu
when you are nished. This task can be made easier and more
accurately with a low cost sound level meter. Radio Shack
and other local suppliers will have this type of product readily
available and it is highly recommended.
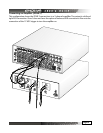
Step 18 - In the SPEAKERS Menu, select the SPEAKER
DISTANCE menu.
Enter the distance from your listening position to EACH
speaker. It will be handy to use that measuring tape to get
as close as possible. Don’t sweat a few inches, but being o by
a foot or more will compromise the system’s ability to create
the a cohesive sound eld.
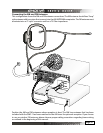
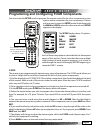
Step 19 - If you play a Dolby Digital or DTS encoded source,
the DMC-1 will automatically select the correct surround
mode. If it is a 2-channel source, you can select a surround mode using the remote’s MODE buttons
or from the front panel.
Step
15
Step
16
Step
17