


Page 14
Page 15
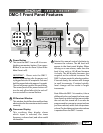
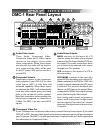
Input Select Buttons
Use these controls to select the source that
you want to listen to and/or view. Using the
On Screen Display (OSD) INPUTS menu, each
input can be adjusted in level so that all the
inputs have similar volumes. Each input can
also be set to enter a desired surround mode
whenever that input is selected.
Note: After you have selected an input, you
should check that the DMC-1 is set to the
desired surround mode (or the stereo mode).
MODE UP/DOWN (Mode Buttons)
These buttons allow you to step up or
down through the various sound playback
modes.
AM/FM Tuner Controls
The AM/FM button toggles between the
AM or FM band. Press and hold it to scan
of the station presets. Press it again or press
a preset button to stop the scan.
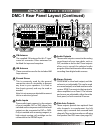
DIRECT Tuner Controls
Use this to enter a station’s frequency
directly using the 0 - 9 keys, such as 9, 3, 9
for 93.9 MHz.
UP/DOWN Tuner Controls
Switch to stations above or below the
frequency of the current station. If
repeatedly pressed, the tuner will move
up or down one frequency step each
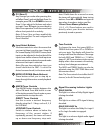
Tone Controls
To change the tone, first press BASS or
TREBLE and then press UP or DOWN to
suit your taste. The display will show the
change in dB level for reference. The range
for both BASS and TREBLE is +/- 10 dB in
steps of 1 dB. The unit returns to its normal
display after a few moments of inactivity,
and any level changes are retained.
The BASS and TREBLE levels can also be
adjusted using the OSD TONE Menu and
the remote control.
Note: The Tone controls do not aect the LFE
channel, or the 8-Channel analog input.
Signal Processing Indicator Lights
DOLBY DIGITAL
This light is on when a Dolby Digital signal
is being decoded.
DTS
This light is on when a DTS signal is being
decoded.
DOLBY PRO LOGIC IIx
This light is on when the Dolby Pro Logic II
or Pro Logic IIx mode is engaged.
DIGI
This light is on when a digital audio signal
is being decoded.
Z II (Zone 2)
Any changes you make after pressing this,
will aect Zone 2 and not the Main Zone. For
example, press Z II, then POWER to turn on
Zone 2, then adjust the Volume and select
an input. Press Z II again to revert back to
Main Zone operation. It will also revert back
after a short period of no activity.
Note: If Zone 2 has not been enabled this
button has no eect. The unit is shipped with
Zone 2 disabled.
time. If held down for a second or more,
the tuner will automatically keep tuning
stations. Press UP or DOWN once again to
stop when it reaches a station you like.
Preset Tuner Memory Buttons
1-9, 0, +10 -These buttons are used to
directly select your favorite stations,
previously stored as presets.
10
5
6
7
8
9