


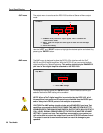


CAUTION
CAUTION
26 Tact Audio
The RCS 2.0S employs some of the most advanced audio-software ever developed.
In order to use the proprietary TacT Room Correction System, you need to install
the supplied room correction software on your computer. Complete instructions for
using the room correction software can be found in the online help available in the
software. To make the room correction process easier for the first time user there is
a Quick Setup feature that is described later in this manual.
Your computer system must meet the following requirements:
- An IBM compatible PC with Pentium 100 MHz, 64 MB Ram & 100 MB
free hard disk space or better
- Microsoft Windows 98, ME, 2000 or XP
- Operating system regional setting must be set to “English(United States)”
- Microsoft Windows-compatible graphics-card and monitor with screen
resolution 800x600 or better
- CD-ROM drive
- Microsoft windows compatible 2- or 3- button mouse
- Standard RS-232 serial port with DB-9 connectors
System requirements
TacT 2.0S Room Correction Software
Software Installation
Follow the steps below to install the TACT 2.0S Room Correction Software:
1 - Start windows and insert the TacT software CD into your CD-ROM drive.
2 - Double-click on the “My Computer” icon on the desktop.
3 - Double-click on the CD icon to launch the CD browser.
4 - Double-click on “Tact 2.0S vx.x.exe” and follow the instructions.
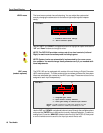
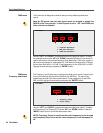
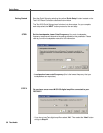
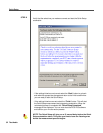
After the installation you will have the option to launch the RCS software. If you
would like to launch the program at this time when prompted, select “Launch
TacT-RCS2.0S” and the software will start. You should now see the TacT 2.0S
Room Correction System main-screen.
Start The Room
Correction software
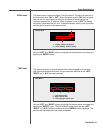
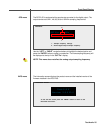
To start the software go to the Windows “Start” menu, select “Programs” then
“TacT-2.0 S” and click on the “TacT-2.0 S” icon. You should now see the
TacT 2.0S Room Correction System main screen.
Microphone
Installation
All TacT measurement microphones are individually calibrated to perform with the
highest accuracy and come with a unique calibration file. This file needs to be
installed before you perform the correction process. The microphone can be en-
abled or disabled by clicking on the “mic:” display window found on the main
screen with your left mouse button to toggle its setting.
1 - Insert the TacT software disc into the computers CD-rom drive.
2 - Start the Tact 2.0S Correction System Software on your computer.
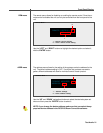
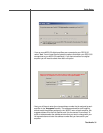
3 - Select “File” from the menu selection at the top of the main software screen.
4 - Select “Microphone” and a new window will open.
5 - Select your CD-Rom drive in the “Look-in” menu you should now see a
file in the larger window below.
6 - Select the “Micxxxxx.mic” file. The number in the file name should
match the serial number of the mic that came with your RCS 2.0S.
7 - The software installation will confirm with the “Mic installation
complete” message.
8 - After you have installed your mic the mic serial number should be
displayed in the “Microphone” section at the top of the main page. If is not
please close the software and restart it to register your microphone with the
software.