


PREPARATION
PREPARATION
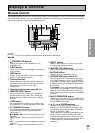
31
En
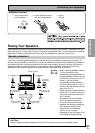
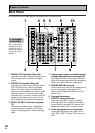
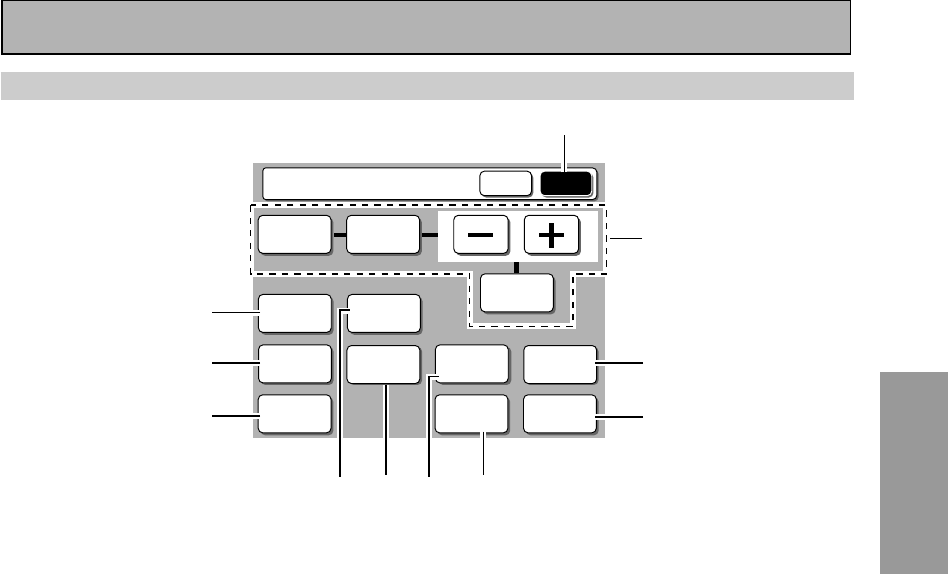
Displays & Controls
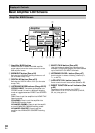
Amplifier SUB Screen
-
STATUS
SPEAKER
A/B
LOUDNESS
INPUT
ATT.
MAIN SUB
SIGNAL
SELECT
TAPE 2
MONITOR
SYSTEM
SETUP
DISPLAY
DIMMER
VIDEO
SELECT
EFFECT/
CH SEL.
BASS/
TREBLE
TONE
1
2
3 0
9
4
5
7
6
8
Amplifier
1 Amplifier SUB button
Press this button to select the SUB amplifier
screen (above) when the remote control is on the
main amplifier screen.
2 DISPLAY DIMMER button (See p.59)
Use to adjust the brightness of the amplifier's
display.
3 STATUS button (See p.59)
Use to display the present mode of the
amplifier and other selected settings.
4 SYSTEM SETUP button
Use for all system setups, including the speaker
and sound systems. For more information see
“Setting up for Surround Sound“
starting on p.37.
5 VIDEO SELECT button
Use to toggle between the different video input
possibilities.
6 SPEAKER A/B button (See p.68)
Use to select the speaker system. A is the
primary setting. The button cycles through the
speaker systems as follows: A]B]A&B]off.
Different conditions apply when bi-amping the
speakers. For this case refer to page 67.
7 LOUDNESS button (See p.54)
Switches the LOUDNESS mode on or off (for all
modes except THX).
8 TAPE 2 MONITOR button
Selects the tape deck (or MD recorder, etc.)
connected to the TAPE 2 MONITOR inputs/
outputs. Allows monitoring of a recording as it's
being made.
9 SIGNAL SELECT button (See p.48)
Press SIGNAL SELECT repeatedly to select one of
the following:
ANALOG : To select an analog signal.
DIGITAL : To select a digital signal
2 RF : To select an 2 RF signal
AUTO : This is the default. If there are analog,
digital and 2 RF signals input, the amplifier
automatically selects the 2 RF signal. If there are
analog and digital signals input the digital will be
selected.
0 INPUT ATT. button
Use to lower the input level of an analog signal
that is too powerful, thus causing the amplifier to
distort. In this case the overload (OVER) indicator
will be flashing furiously.
- TONE control/EFFECT CH SEL. buttons
TONE button
This button has two functions. Firstly, it
switches between TONE on and TONE BY-
PASS, which bypasses the tone circuitry.
Secondly, you need to press the button before
using the BASS & TREBLE (+/–) buttons (see
p.55).
EFFECT/CH SEL. button
Switches the tone adjust controls between the
front, center, surround and surround back
speakers. You can then use the + and – buttons
to adjust the sound (see p.52).
While in Advanced mode, you can also adjust
the effect level.