


ENGLISH 9
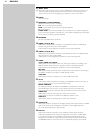
3. Functional overview
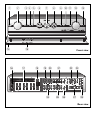
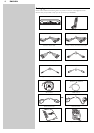
3.1 Front view
1 B STANDBY-ON
Switches the DFR9000 on and to standby.
Standby/On indicator (indicator in the Power/standby button)
– Lights up red when your DFR9000 is connected to the mains and when it is switched
off (to Standby).
– Goes out when your DFR9000 is switched on.
2 SOURCE
Selects the various connected sources in amplifier mode.
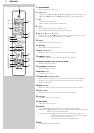
34
– Navigates in up (3) and down (4) direction in the menu.
– Select previous (4) and next (3) radio stations in TUNER or DAB mode.
3 12
– Navigates in left (1) and right (2) direction in the menu.
– Selects next (2) or previous (1) preset station in TUNER and DAB mode.
4 OK
– Confirms actions in the menu.
– Selects secondary audio services in DAB mode.
5 SYSTEM MENU
Opens and closes the system menu.
6 Left display
– Indicates the present status of the DFR9000.
– Indicates signal strength in DAB mode.
– Indicates the present source.
7 Centre display
Informs you on the present status of your DFR9000, selected surround modes and
displays the system menu, submenus and menu settings.
8 Right display
– Shows which speakers are active.
– Indicates volume level.
9 SURROUND
Selects the various available surround modes. Availability of surround modes depends on
speaker setup and type of input signal.
10 BASS / TREBLE
Enables the VOLUME control to adjust the low (Bass) and high (Treble) frequency
response for all channels.
11 IR
Receives the signals from the remote control.
12 VOLUME
Controls the output level of all audio channels.
13 PHONES
Outputs audio signals when listening with headphones.
14 Flap
Covers the audio and video input sockets on the front of the DFR9000.
15 CAM
Inputs audio and video signals from a portable external source, e.g. a video camera.
Legend of illustrations on inside flap.