


9760-Graphic User Interface Manual
50
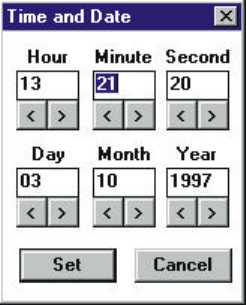
4.13 TIME AND DATE
4.13.1 SETTING THE TIME AND DATE
NOTE: Care should be taken when the system is networked, because changing the time/date af-
fects the time for the entire system. The appropriate authority should give approval before the time
and date is changed.
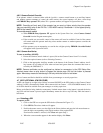
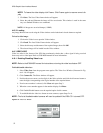
To set the time and date:
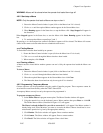
1. Select Time and Date from the Program menu option. The Time and Date window (illustrated
in figure 4-13) will appear.
2. Alter the time and date by clicking on < or > located below each option. This is a 24 hour
clock. If it is 8 o’clock in the evening (8.00 p.m.), enter 20:00:00.
3. When the correct time and date has been entered, click Set.
The new time and date will be updated on all equipment in the system. It may take up to one minute for
these changes to be updated on monitors.
NOTE: If an impossible date or time is entered, the system will either beep and prompt you to enter
the information again, or it may accept the command but not update the time and date on the sys-
tem.
Figure 4-13: Time and Date Window.
4.14 VCR RECORDING
The operation of a VCRs depends on the way it is connected to a 2030 system. VCRs can be operated using
a GPI (illustrated by VCRs 1 and 3 in figure 1-27 in the 2030 manual), or operated via a 2023 Alarm Inter-
face unit (illustrated by VCR 2 in figure 1-27 in the 2030 manual).
NOTE: VCRs can be operated manually with the VCR controls.
4.14.1 Using a GPI to operate a VCR
4.14.1a Operating a VCR Connected Between a VMB and a Monitor
To operate a VCR connected as a monitor:
1. Select the camera that requires recording (refer to Selecting Cameras).
2. Ensure the GPI window is open. If it is closed, click on the GPI icon.
3. Click on GPI No. The Select window will appear.
4. Position the mouse cursor over the digits in the Select window and click the left mouse
button to enter the digits corresponding to the GPI required.
If an incorrect number is selected, click Clear and repeat Step 4.