


ENGLISH
38
BASIC
CONNECTIONS
BASIC OPERATION
ADVANCED
CONNECTIONS
SETUP
ADVANCED
OPERATION
TROUBLESHOOTING
OTHERS
NAMES AND
FUNCTION
SETUP
5 PREFERENCE
•
Zone A Setup :
•
Zone B Setup :
“5-1 ZONE SETUP”
(see page 39)
•
DC Trigger Setup :
“5-2 DC TRIGGER SETUP”
(see page 39)
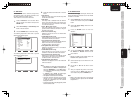
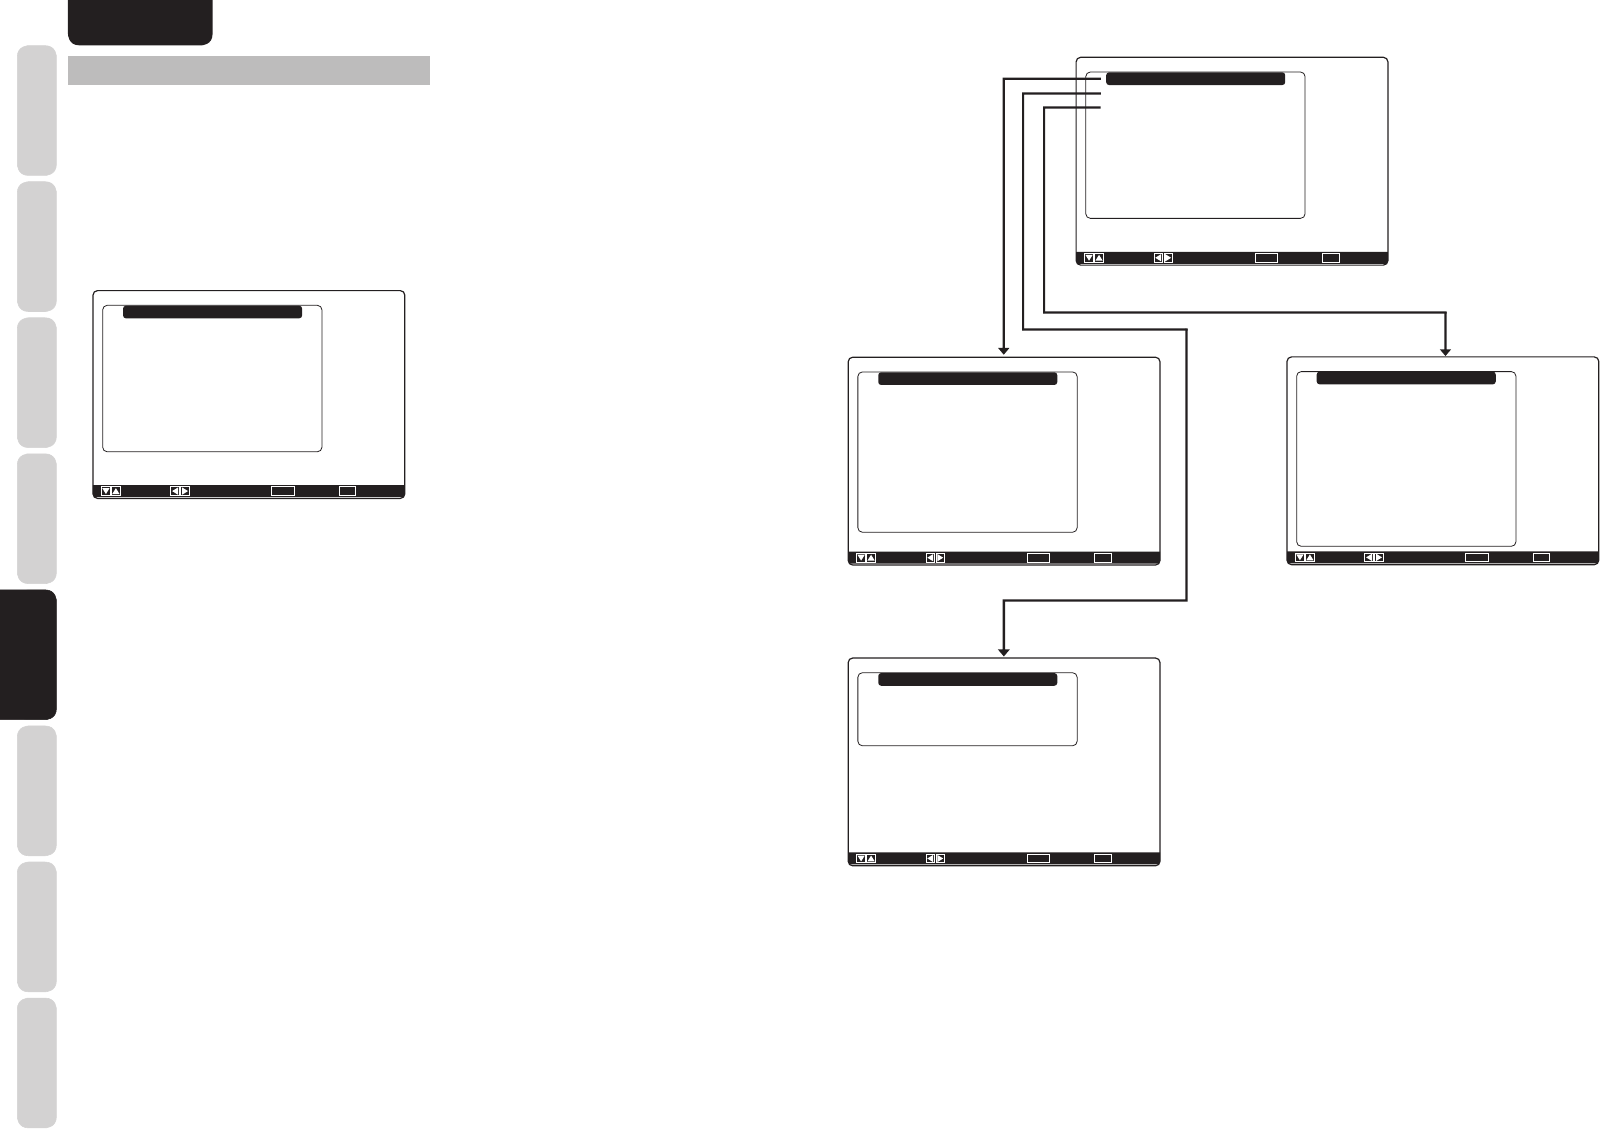
1.
Select “Preference” from Main Menu with the
3
or
4 cursor buttons and press the ENTER
button.
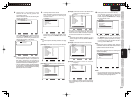
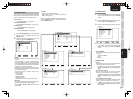
Preference
Zone A Setup
Zone B Setup
DC Trigger Setup
Optical Output
Standby Mode
Audio
HDMI Audio
HDMI Lip Sync
Return
: Up / Down : Enter : Select Exit : Exit
: Rec
: Economy
: Main
: Enable
: Disable
2.
Select the desired menu with the 3
or
4 cursor
buttons and press the ENTER button.
Optical:
Select when using equipment with optical digital
output.
Rec: Select when recording to a CD
recorder or MD recorder.
(See page 12)
Zone B: Select when using ZONE B.
(See pages 21, 39, 64)
Standby:
When this is set to “Economy”, you can reduce the
power consumption when the unit is in the Standby
mode. When “Economy” is selected, “TV Auto”
and “RS-232C” are disabled when the unit is in the
Standby mode.
Audio:
In the Audio mode, Dolby Digital and DTS output
is set to either “Main” or “Sub”. Select “Audio” with
the 1 or 2 cursor buttons, then select Main ↔ Sub
↔ Main+Sub with the 1 or 2 cursor buttons.
Preference
Zone A Setup
Zone B Setup
DC Trigger Setup
Optical
Standby Mode
Audio
HDMI Audio
HDMI Lip Sync
Return
: Up / Down : Enter : Select Exit : Exit
: Rec
: Economy
: Main
: Enable
: Disable
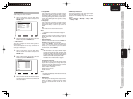
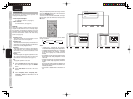
Zone A Setup
Audio Source
Sleep Timer
Stereo / Mono.
Zone Pre Out
Volume Mode
Level
Zone Speaker Out
Volume Mode
Level
Return
: Up / Down : Change Enter : Exit : Exit
: DVD
: Off
: Stereo
: Off
: Variable
: -90dB
:
* * *
:
* * *
:
* * *
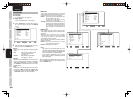
Zone B Setup
Audio Source
Sleep Timer
Zone Digital Out
Return
: Up / Down : Change Enter : Exit : Exit
: DVD (Dig.2)
: Off
: Off
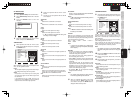
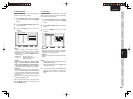
DC Trigger Setup
TriggerSystem Error!!
TV
DVD
VCR
DSS
AUX1
TAPE
CD/R
7.1ch Input / AUX2
Tuner
USB Audio
Return
: Up / Down : Change Enter : Exit : Exit
: Disable
:
* * *
:
* * *
:
* * *
:
* * *
:
* * *
:
* * *
:
* * *
:
* * *
:
* * *
:
* * *
HDMI Audio:
This setting determines whether to play back
audio input to the HDMI jacks through the unit or
output it through the unit to a TV or projector.
Enable: The audio input to the HDMI jacks can
be played back by this unit.
In such case, audio signals are not
output to the TV or projector.
Through: The audio input to the HDMI jacks is not
output from the speaker terminals of the
unit. Audio data is output directly to the
TV or projector. This setting is used to
listen to audio on a multi channel TV,
etc.
HDMI Lipsync:
Video signals may take longer to process than
audio signals depending on the connected video
equipment.
When the unit is connected to TV or Projector
supporting Auto Lipsync Correction in HDMI
1.3a, audio and video can be automatically
synchronized using this function.
Use the 1 or 2 cursor buttons to switch between
Enable and Disable.
Enable: Auto Lipsync Correction is used to
synchronize audio and video.
Disable: Deactivates this function.
Note:
• This function is not available when the unit is
connected to equipment that does not support HDMI
1.3a or Auto Lipsync Correction. For details, check
the user’s manual of the connected equipment.
• If this function is unavailable, you can use the
regular Lipsync function to synchronize audio and
video. (See page 45)
After you complete this portion of the setup, move the
cursor to “Return” with the 3 or 4 cursor buttons and
press the
ENTER
button.