


ENGLISH
27
BASIC
CONNECTIONS
BASIC OPERATION
ADVANCED
CONNECTIONS
SETUP
ADVANCED
OPERATION
TROUBLESHOOTING
OTHERS
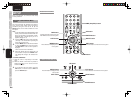
NAMES AND
FUNCTION
SETUP
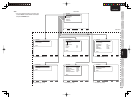
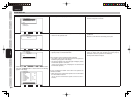
1-1 FUNCTION INPUT SETUP
(ASSIGNABLE DIGITAL INPUT)
The 5 and F (Front) digital inputs can be assigned to
a desired source.
HDMI and COMPONENT inputs can be assigned to
the preferred source.
Use this menu to select which digital input jacks are
to be assigned to which input source.
1.
Select “Function Input Setup” from the Input
Setup menu with the 3
or
4 cursor buttons and
press the ENTER button.
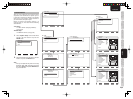
Function Input Setup
Function
TV
DVD
VCR
DSS
AUX1
TAPE
CD/R
AUX2
SIRIUS
Return
Mode
Auto
Auto
Auto
Auto
Auto
Auto
Auto
Auto
Analog
Digital
1
2
3
4
F
-
5
-
-
HDMI
1
2
3
-
-
-
-
-
*
Comp.
1
2
3
-
-
-
-
-
*
: Up / Down : Enter : Return Exit : Exit
S / Video
1
2
3
4
1
2
3
*
*
2.
Select a setting with the 3, 4, 1, and 2 cursor
buttons, and assign a mode and input jack
(Digital, HDMI, Comp, S/Video).
MODE
Auto:
Select “Auto”, for automatic detection of the digital
input signal condition.
If there is no digital signal, but there is an analog
signal present, the analog signal will be played.
“Auto” is the initial setting of all input sources.
HDMI:
Select “HDMI”
, when only a HDMI signal will be
used
.
Digital:
Select “Digital”, when only a digital signal will be
used.
Analog:
Select “Analog” for input sources for which no
digital input jacks are used.
Digital
5 and F(Front) digital inputs can be assigned to a
desired source.
Assign the number of a digital input jack to the
device.
HDMI
Assign the number of an HDMI input jack to the
device.
Note:
• When FUNCTION MODE is set to HDMI and
HDMI AUDIO of “5. PREFERENCE” is set to
Through, audio is not output from the unit. (See page
38)
Comp
Assign the number of a component video input
jack to the device.
S/Video
Assign the number of a composite video and S-
video input jack to the device.
Note:
• Video and S-video can use the same numbers when
assigning to input functions.
• The ✽ mark in AUX1 indicates that other inputs
cannot be assigned.
3.
Press the ENTER button.
4.
Select each mode setting and input terminal
with the 1
or
2 cursor buttons.
5.
Press the ENTER button.
6.
Repeat steps 2-5 until all items are set.
Note:
• Assignments cannot be made in sections with a ✽
mark.
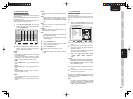
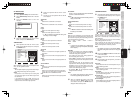
1-2 7.1 CH INPUT SETUP
This menu is for adjusting the speaker levels for 7.1-
channel input sources.
Here you will adjust the volume for each channel so
that they are all heard by the listener at the same
level.
1.
Select “7.1 ch Input Setup” from the Input
Setup menu with the 3
or
4 cursor buttons and
press the ENTER button.
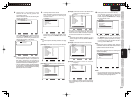
7.1ch Input Setup
Video-in
Front Left
Center
Front Right
Surround Right
Surround Back Right
Surround Back Left
Surround Left
Subwoofer
Return
: Last
: 0.0dB
: 0.0dB
: 0.0dB
: 0.0dB
: 0.0dB
: 0.0dB
: 0.0dB
: 0.0dB
: Up / Down : Change Enter : Exit : Exit
2.
Select “Video-in” with the 3
or
4 cursor
buttons.
3.
Using the 1
or
2 cursor buttons, select the
video input source to be played through the
MONITOR OUT jack.
The input source is switched by pressing the
1
or
2 cursor buttons as follows;
Last ↔ TV ↔ DVD ↔ VCR ↔ DSS ↔ AUX1
↔ TAPE ↔ CD/R ↔ AUX2 ↔ Video-off ↔
Last ↔...
Notes:
•
When “Last” is selected, the source is set to the source
selected before the 7.1 ch input menu was
activated.
• When
“
Video-off
” is selected,
no signal is emitted
from MONITOR OUT jack.
4.
Select desired channel with the 3
or
4 cursor
buttons.
5.
Using the 1
or
2 cursor buttons, adjust the
volume level of each channel.
Move the cursor to “Return” with the 3, 4, 1, and 2
cursor buttons, and press the ENTER button to go to
the Input Setup menu.
Note:
• The volume level can be set between -12 dB and
+12 dB in 1 dB increments on all channels except
the subwoofer (SUB W), which can be set from
-18dB to +12 dB in 1 dB increments.