


Configuring Communication
53
MAX-CSE/MAX-CSD10 Operation/Reference Guide
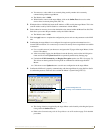
12. Click OK to return to the Communications Settings dialog and place a checkmark within the
Authentication Required radio box if your Master has been previously secured with a username/
password. This opens up a Master Controller User Name and Password dialog.
13. Within this dialog, you must enter a previously configured username and password (with sufficient
rights) before being able to successfully connect to the Master.
14. Click OK to save your newly entered information and return to the previous Communication
Settings dialog.
15. Click OK to begin the communication process to your Master.
16. Click Yes to interrupt the current communication from the Master and apply the new settings.
17. Once the particular System Master is configured for communication via an IP Address, remove the
DB9 connector from the Program port on the NI on-board Master.
18. Click Reboot (from the Tools > Reboot the Master Controller dialog) and wait for the System
Master to reboot. The STATUS and OUTPUT LEDs should begin to alternately blink during the
incorporation. Wait until the STATUS LED is the only LED to blink.
19. Press Done once until the Master Reboot Status field reads *Reboot of System Complete*.
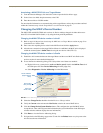
20. Click the OnLine Tree tab in the Workspace window and right-click the associated System number
and select Refresh System. This establishes a new connection to the specified System and
populates the list with devices on that system. The communication method is then highlighted in
green on the bottom of the NetLinx Studio window.
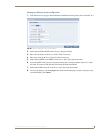
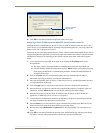
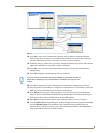
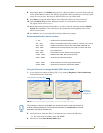
FIG. 34 Assigning Master Communication Settings and TCP/IP Settings
If you are currently connected to the assigned Master, a popup asks whether you
would want to temporarily stop communication to the Master and apply the new
settings.