


127 En
Using multi-zone configuration
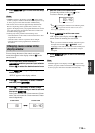
ADVANCED
OPERATION
You can select the zone you want to control by using the
control buttons on the front panel or on the remote control.
While Zone 4 is turned on, no signal is output at the DVR OUT,
VCR OUT and MD/CD-R OUT jacks.
■ Basic operation
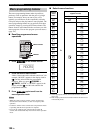
Front panel operations
1 Press
O
ZONE 2,
O
ZONE 3 or
O
ZONE 4
on the front panel to turn on or off each zone.
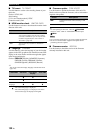
2 Press
O
ZONE CONTROLS on the front
panel repeatedly to select the zone you want
to control.
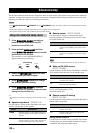
Each time you press
O
ZONE CONTROLS, the
front panel display changes as shown below, and the
indicator for the currently selected zone flashes for
approximately 10 seconds. However, no indicator
flashes when the main zone is selected.
ZONE2
Controls the Zone 2 amplifier or tuner functions.
ZONE3
Controls the Zone 3 amplifier or tuner functions.
ZONE4
Controls the Zone 4 amplifier and tuner functions
y
You must complete this step within 10 seconds while the
selected zone flashes in the front panel display. Otherwise,
the currently selected zone mode is automatically
canceled.
3 Perform the desired operation in the selected
zone (page 127).
y
To turn off the desired zone, press OZONE2, OZONE3
or OZONE4 again.
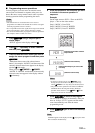
Remote control operations
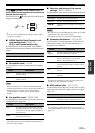
1 Press
H
ZONE repeatedly to select the zone
you want to control.
“MAIN”, “ZONE2”, “ZONE3” or “ZONE4”
indicator appears in the display window (D) on the
remote control.
2 Press EPOWER to turn on the selected
zone.
3 Perform the desired operation in the selected
zone (page 127).
y
To turn off the desired zone, press DSTANDBY.
■ Selecting the input source of Zone 2,
Zone 3 or Zone 4
Rotate the LINPUT selector (or set the
operation mode selector to FAMP and then
press one of the input selector buttons (3)).
• Select “TUNER” as the input source to use the FM/AM
tuning features (page 56) in the selected zone.
• Select “XM” as the input source to use the XM
Satellite Radio features (page 61) in the selected zone.
• Select “SIRIUS” as the input source to use the SIRIUS
Satellite Radio features (page 65) in the selected zone.
• Select “DOCK” as the input source to use the iPod
features (page 73) or Bluetooth features (page 71) in
the selected zone.
• Select “USB/NET” as the input source to use the USB
features (page 76) or network features (page 76) in the
selected zone.
The input sources are shared across all zones.
■ Adjusting the volume level of Zone 2 or
Zone 3
Rotate
P
VOLUME (or press
J
VOLUME +/–).
y
Press
L
MUTE on the remote control to mute the sound output
to the selected zone.
After the connections, turn on this unit and set the
speaker terminal assignments with “Zone SP Assign”
(page 103).
Controlling Zone 2, Zone 3 or Zone 4
Note
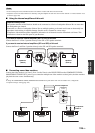
ZONE2
ZONE3 ZONE4
No indicator flashes
when the main zone is selected.
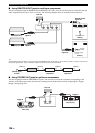
Note
MAIN
ZONE 2 ZONE 3
ZONE 4
(Zone 2) (Zone 3) (Zone 4)
(Main zone)