


125 En
Using multi-zone configuration
ADVANCED
OPERATION
• To avoid unexpected noise, DO NOT use the Zone 2/Zone 3 feature with CDs encoded in DTS.
• Adjust the second zone and/or third zone volume by using the amplifier in each zone when “Zone2 Volume” or “Zone3 Volume” is set
to “Fixed” (page 103).
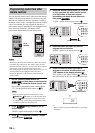
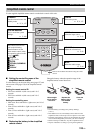
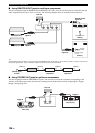
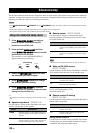
■ Using the internal amplifiers of this unit
If you want to use one internal amplifier (SP1 or SP2) of this unit
Connect the Zone 2 or Zone 3 speakers directly to the SP1 or SP2 speaker terminals.
If you want to use two internal amplifiers (SP1 and SP2) of this unit
Connect the Zone 2 and Zone 3 speakers directly to the SP1 and SP2 speaker terminals.
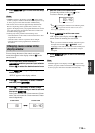
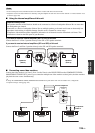
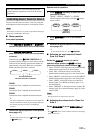
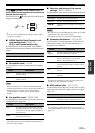
■ Connecting zone video monitors
Connect the video monitor(s) in Zone 2, Zone 3 and/or Zone 4 to the ZONE VIDEO and/or COMPONENT VIDEO
(MONITOR OUT/ZONE OUT) jacks. If you connect the multiple zone video monitors to these jacks, the video monitors
play back the same source simultaneously.
y
To assign the COMPONENT VIDEO (MONITOR OUT/ZONE OUT) jacks to the main zone or another zone, configure the
“Component Assign” setting (page 103).
Notes
Important safety notice
The speaker terminals of this Receiver should not be connected to a Passive Loudspeaker Selector Box or more than
one loudspeaker per channel.
Connection to a Passive Loudspeaker Selector Box or multiple speakers per channel could create an abnormally low
impedance load resulting in amplifier damage. See this owner’s manual for correct usage.
Compliance with minimum speaker impedance information for all channels must be maintained at all times. This
information is found on the back panel of your Receiver.
PRESENCE/ZONE 2/ZONE 3
+
R
L
SP1
ZONE 2/ZONE 3
+
R
L
SP2
Speakers
(Zone 3)
This unit
Speakers
(Zone 2)
ZONE
VIDEO
MONITOR OUT/
ZONE OUT
Y
P
R
P
B
VV
PRPBY
This unit
Source component
Video In Video In
Video monitor
(Zone 3)
Video monitor
(Zone 2)
Video monitor
(Zone 4)
Component
video in