


26
Remember: After making changes to the settings press/click the APPLY button.
NO RECORD: As the name suggests, the DVR will not record anything from this
channel while NO RECORD is selected. We suggest only using this
setting if you’re absolutely sure you don’t want to see what’s going
on during these times.
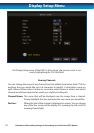
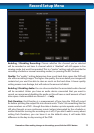
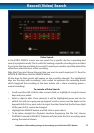
Setting the Schedule
The rst step in setting the schedule is choosing which channel you’d like to set the
schedule for. From the CH drop-down menu, select the channel you’d like to set the
schedule for.
If you’d like to set the schedule for more than one channel at a time, you have two
options. One option is to manually enter the same information for each channel
individually.
The other option is to choose ALL from the CH drop down menu. Selecting this will
apply the settings in the schedule to all channels on the DVR. If you want to set a
base schedule for all channels, and then congure them individually, select ALL, set
your basic schedule, and then ne tune channels one at a time. Changing the ALL
schedule will overwrite any schedule already set for individual channels.
Copying and Pasting Schedules from day to day
Rather then enter the same schedule information multiple times for each day you
wish, you can use the COPY function.
To copy the schedule settings from day to day, select the day you’d like to copy from
on the rst drop down menu. Then, select the day you’d like to copy the schedule to
from the second. If you’d like all days to operate on the same schedule, choose ALL
from the second drop-down menu.
Using the arrow buttons or the mouse, highlight the COPY button, and left click or
press select. The schedule for the selected day will be copied to the day(s) you have
selected.