


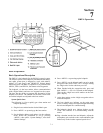
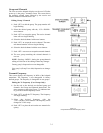
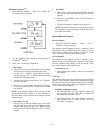


Entering ClearScan
TM
1. Press and hold <MENU> + <SET> for 3 seconds. The
following screen will appear:
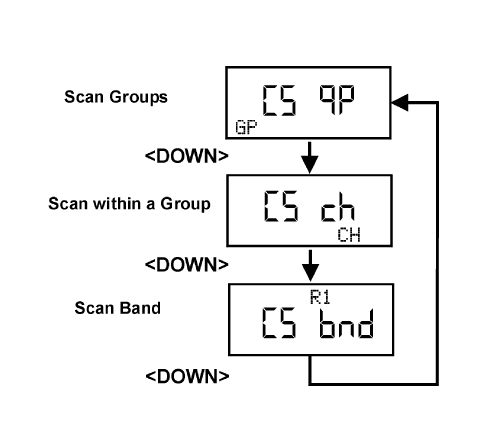
2. Use the <DOWN> arrow button to select the type of
ClearScan
TM
desired.
3. Push <SET> to start the ClearScan
TM
4. Scan Groups
a. After the scan is done the group icon will be flashing.
The left side of the screen will display the group.
b. Use the <UP> / <DOWN> arrow buttons to select a
group, then push <SET> to set the group and start the
channel scan within that group.
c. After the scan within a group use the <UP> / DOWN>
to select a channel.
d. Hit <SET> to set the channel. The unit will now be set
to the group selected earlier and the receive channel
just selected.
NOTE: The transmit channel will be the one in that
group that the unit was already set to. The ClearScan of
the base station would select the best beltpack transmit
channels to use.
5. Scan within a Group
a. After the scan is done the channel icon will be flash-
ing. The right side of the screen will display the best
channel in the group. Use the <UP>/ DOWN> arrow
buttons to select a channel then push <SET> to set the
channel.
6. Scan Band
a. Push <SET> to stop the scan band searching. The unit
will sort the result and display the top 20 clear fre-
quencies.
b. Use the <UP>/<DOWN> arrows to select a frequency
then push <SET>.
c. The receive frequency is placed in user group 63u.
NOTE: The transmit frequency will not be in group 63u.
The frequency to enter for transmit would be the result a
base station scan band.
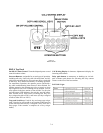
Special Button Features
Factory Defaults
1. Press and hold the <MENU> + <SET> + <UP> +
<DOWN> for three seconds.
This function sets the beltpack to Group 1, channels A and 1
and ERASES any user defined groups in memory. It will set
unit to factory defined menu settings. It will also set the
“Talk” and “relay” button to their default modes.
1st Use Defaults
This function sets the beltpack to Group 1, channels A and 1
and leaves any user defined groups in memory. It will set unit
to factory defined menu settings. It will also set the “Talk”
and “relay” button to their default modes.
Activating 1st Use
1. Press and hold the <MENU> button as powering-up
the beltpack.
Lock Out
This function allows the user to lock the top panel and menu
options. The call waiting window button and intercom button
will still work but the relay button mode cannot be changed.
Likewise the values in the screens of the beltpack’s rear LCD
can be viewed but not changed.
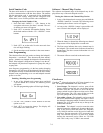
Enabling / disabling Lock Out
1. Press and hold The <UP> and <DOWN> buttons for
three seconds. The work “SECURE” will appear on
the screen when lockout is active.
2. Press and hold the <UP> and <DOWN> button for
three seconds again to disable lockout. The work
“ACCESS” will appear.
7-9
Figure 7-8
ClearScan
TM
Menus