


ClearScan
TM
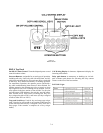
Press and hold <MENU> + <SET> for 3 seconds to enter the
ClearScan
TM
menu. There will be three option from which to
choose from by using the <UP>/<DOWN> arrow buttons and
then press <SET>. Those options and the results are explained
below.
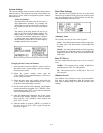
ClearScan
TM
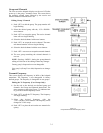
Groups
This option scans all the groups in the base station. The
group with the highest number of clear receive channels
is listed at the top of the list (<UP> arrow all the way to
the top). The next group down has the second highest
number of clear receive channels and so forth. Channels
that clearly have RF interference on them are inverted.
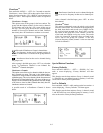
A possible result of ClearScan
TM
Groups is shown below:
= No frequency in that receive channel position. It
would be dashed lines if examined in the group/channels
screen.
= Interference found on the receive channel during
the groups scan.
After a group is decided upon, press <SET> to select that
group. A ClearScan
TM
Channel is now initiated. See
ClearScan
TM
Channels description.
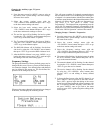
ClearScan
TM
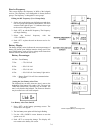
Channels
This option scans all the receive channels within the base sta-
tion’s currently set group. This scan is also initiated after a
ClearScan
TM
Group in order to find the clear receive channels
within that group. The receive channel with the least amount of
RF noise on it is listed at the far left (<UP> arrow all the way to
the left). The next channel to the right has the next least amount
of RF noise on it and so forth. Channels that clearly have RF
interference on them are inverted.
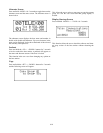
A possible result of a ClearScan
TM
Channel is shown
below.
=Interference found in the receive channel during the
scan or no receive frequency in that receive channel posi-
tion
After a channel is decided upon, press <SET> to select
that channel.
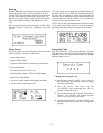
ClearScan
TM
Band
This option continuously scans the whole receive band
until user intervention. The scan starts at the beginning of
the band, then checks and records every 200kHz for the
RF received signal strength level. Press <SET> to store
the results in user group 63u. Press <MENU> to bail out
of the band scan without saving any results. The results
of the six clearest RF frequency areas are listed in the
receive side of user group 63u. Channel 1 is the best
(clearest) frequency found, channel 2 is the next best and
so forth to channel 6.
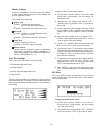
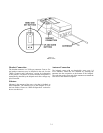
Special Button Functions
Factory Defaults
Press and hold <MENU> + <SET> + <DOWN> for 3 sec-
onds. A screen displaying, “Factory Defaults” will then
appear.
This function sets the base station to Group 1, channels A and
1 a ERASES any user defined groups in memory. It will also
set the unit to factory defined parameters.
1st Use Defaults
Press and hold <MENU> while turning on the base station. A
screen displaying, “Factory Defaults” will then appear.
This function sets the base station to Group 1, channels A and
1 and RETAINS any user defined groups in memory. It will
also set the unit to factory defined parameters.
6-9