


64
Operating the DVD600
II
DVD Changer
5. The third box will now be highlighted to indi-
cate that a selection for chapter should be
made. This choice is available only for DVD
discs, as CD discs do not have chapter capa-
bility. The number in parentheses under the box
shows the maximum number of chapters on the
disc. If “999” appears, it indicates that the disc
selected has not yet been played and the unit
does not yet know the type of disc and how
many titles or tracks are available. If “0” appears,
this is your indication that the disc is a CD.
6. Press the
⁄
/
¤
Buttons y to scroll
through the list of available chapters. Press the
Enter Button or › Button to move
to the next selection area.
7. The highlighted box will now appear in a col-
umn where the options are “Add,” “Delete,”
“Play” and “Done,” and the “Add” box should
be highlighted. Since this is the first selection to
be entered, press the
Enter Button and
note that the selected disc, track, title and chapter
will be added to the Playlist column. The highlight
will return to the disc box to allow you to enter
additional selections by repeating Steps 2 through 7.
8. Repeat the steps as needed, noting that the
selections will be added to the playlist up to a
maximum of 32 steps.
•
To delete an entry from the playlist, press the
› and
⁄
/
¤
Buttons y until the
selection to be deleted is highlighted in the
playlist. Press the
Enter Button and
then press the
¤
Button once, so that
the word
DELETE is highlighted. Press the
Enter Button and the selection will be
deleted. A selection may also be deleted by
following this step to highlight it and then
pressing the
Clear Button .
•
To insert an entry into a playlist that has
already been created, press the
› and
⁄
/
¤
Buttons y until the place on the
playlist where you wish to insert a selection
is highlighted. Press the
Enter Button
and then press the ¤ Button once,
so that the word
INSERT is highlighted,
and then follow Steps 2 through 7. When you
have entered the data for the selection, high-
light the word
INSERT and press Enter.
9. When you have completed the playlist, you
may play the programmed selections by press-
ing the
› and
⁄
/
¤
Buttons y until
PLAY is highlighted. Press Enter to begin
playback of the entire playlist. During Programmed
Play, the
Program Indicator will light.
10. To exit from the programming screen, press
the
Return Button .
Notes on Programmed Play
•
To stop the playback of a programmed
playlist, press the
Stop Button
twice. Pressing the Stop Button only
once will stop play of the current track, but
will allow you to resume play of that track
and the playlist by pressing the
Play Button
again.
•
To cancel programmed playlists, press the
Clear Button .
•
To edit the contents of a playlist using the
Information Display only, and not the
on-screen display, follow these steps:
•
Press the
Check Button .
•
Press the Check Button again to step
through each of the programmed items. The
Program Sequence Number will appear on
the far right side of the
Information
Display
, next to the PR indication.
•
Use the
‹
/
› Buttons ` to select
the disc, track or chapter to be edited.
•
Use the
⁄
/
¤
Buttons y to change
the selection.
•
Press the
Clear Button to remove a
program step.
•
When all steps have been programmed,
press the
Play Button to begin pro-
grammed play, or the
Return Button
to exit the programming function and
return to normal operation.
Bookmarks
Bookmarks are a feature of the DVD600
II
that
allows you to mark up to nine different points
on a disc and to quickly return to those points
later. The Bookmarks feature works on both
DVD and CD discs.
To Enter a Bookmark
1.
During disc playback, press the Status
Button
e if the Menu Bar is not already on
the screen.
2. Press the ‹
/
› Buttons ` until the
disc icon with the word “Mark” below it is
highlighted.
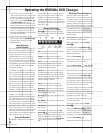
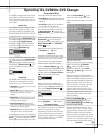
3. Press the Enter Button to view the
Bookmark Banner (Figure 30).
Figure 30
4. At any point during playback where you wish
to mark a spot so that you may return to it later,
press the
Enter Button . Note that a check
mark “
✔” will appear in the box on both the
“Go To” and “Mark” lines.
5. To enter additional Bookmark points, press
the
‹
/
› Buttons ` until another empty
box on the “Mark” line is highlighted. Press the
Enter Button .
6. Repeat Steps 4 and 5 for up to nine Bookmark
points on a disc.
7. To exit the Bookmark Banner, press the ‹
/
›
Buttons ` until the box at the right side
of the banner with the arrow and open door icons
is highlighted. Press the
Enter Button to
return to normal play. Press the
Clear Button
to remove the Bookmark menu bar from the
on-screen display.
The marked spots will remain in the memory of
the DVD600
II
as long as the disc is not changed.
The Bookmark memory will remain active if the
disc is stopped or the unit turned off, but it will
be lost if the disc is removed from the player, or
if the disc tray drawer is opened when the unit
is the Stop mode.
To Recall a Bookmarked
Scene or Passage
Note that a check mark “✔” will appear in the
box on both the “Go To” and “Mark” lines.
1. During disc playback, press the Status
Button
e if the Menu Bar is not already on
the screen.
2. Press the ‹
/
› Buttons ` until the
disc icon with the word
MARK below it is
highlighted.
3. Press the Enter Button to view the
Bookmark banner.
4. Press the
⁄
Button y so that a box
on the top “Go To” line of the banner is high-
lighted.
5. Press the ‹
/
› Buttons ` so that the
box below the number of the desired Bookmarked
spot is highlighted.
6. Press the Enter Button to go directly to
the selected point on the disc.
7. To exit the Bookmark Banner, press the ‹
/
›
Buttons ` until the box at the right side
of the banner with the arrow and open door
icons is highlighted. Press the
Enter Button
to return to normal play. Press the Clear
Button
to remove the Bookmark menu bar
from the on-screen display.
Note that at any time while the Bookmark
Banner is displayed, entering any
Numeric Key
– will highlight that numbered
mark, but will not proceed to a different chapter
or track on the disc.