


12
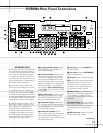
Quick Guide to Using the JBL Cinema ProPack 600
II
The DVD600
II
can play discs in the following
formats:
• Both 5-inch (12cm) and 3-inch (8cm) discs
• CD audio discs • DTS audio discs
• CD-R audio discs • CD-RW audio discs
• DVD movie discs
• VCD video compact discs
• Discs containing MP3 compressed-audio files
However, it cannot play:
• DVD discs with a Region Code other than
"1" or "All"
• DVD discs using PAL format video
• DVD-ROM data discs
• DVD-RAM discs • CD-I discs
• CD-G discs • SVCD discs
• Photo CD discs • CD-R/RW data discs
Notes on DVD-Audio discs:
• The DVD600
II
is not capable of playing selec-
tions in the DVD-Audio format. However, many
DVD-Audio discs include audio tracks in the
PCM, Dolby Digital or other formats which the
DVD600
II
is capable of playing. You may need
to press the
Title Button x rather than the
Menu Button z in order to access these
formats.
• Some DVD-Audio discs display a still picture
while a selection is playing. Sometimes, this
picture may disappear when play is stopped and
the DVD600
II
is placed in the Resume mode. To
restore the picture, fully stop play by pressing
the
Stop Button twice before contin-
uing play.
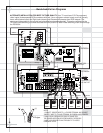
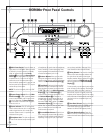
Plug the
Power Cord into an unswitched
AC outlet.
Press the
Main Power Switch on the
DVD600
II
so that it latches and the Power
Indicator
turns amber, indicating that the
unit is in the Standby mode. Turn the unit on by
pressing the
System Power Control Button
. The Power Indicator will turn
green.
Open the
Disc Tray by pressing the
Open/Close Button and insert up to
five discs in the tray locations, using the
Disc Skip Button to rotate the
carousel to access all locations. Make sure
each disc is loaded with the label side up, and
that it is seated correctly in its location.
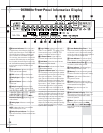
When you close the drawer, the DVD600
II
will
automatically engage the On Screen Library™
(patent pending) system, which will read and
identify each disc, then display a menu identify-
ing the type (DVD, CD or MP3) and title (if avail-
able) by numbered disc location. The process
can take approximately one minute. You may
press the
Stop Button , or use the
⁄
/
¤
Buttons y to scroll down to
the
Exit button, and press the
Set Button ,
to
interrupt this process. Alternatively, you may
use the
⁄
/
¤
Buttons y to scroll to a
desired disc, even if the disc has not yet been
identified, and press the
Set Button to
begin play. Also, if you closed the disc tray by
pressing one of the
Direct Access Buttons
, the DVD600
II
will immediately begin to
play that disc.
Pressing a
Numeric Key –
while the On Screen Library is displayed will
remove it from the display, but will not change
the current disc or start play of any disc.
Whichever type of disc is playing, make sure
that you have selected DVD as the input source
on the DCR600
II
by pressing d on the remote,
or
! on the front panel of the receiver until
DVD is indicated.
Skip to another disc that was previously loaded
in the DVD600
II
by pressing the Disc Skip
Button
. If you press a Numeric Key
for any disc position
containing a disc within three seconds, the
DVD600
II
will skip directly to that disc.
Otherwise, the DVD600
II
will play the next
available disc in order. Press the
Disc Skip
Button
twice in succession for a
faster jump to the next disc.
You may also use JBL’s exclusive On Screen
Library system later during the listening session
to display all discs currently loaded by pressing
the
On Screen Library Button , as long as
the current disc is stopped. If you had previously
interrupted the On Screen Library system while
it was in the process of identifying the loaded
discs, it will resume that process at this time.
Press the
DVD Button d and use the
⁄
/
¤
Buttons y to select a disc and the
Set Button to begin playing that disc.
Directly access any track on the current disc
while it is playing or in Pause mode by pressing
one or more of the
Numeric Keys
–
.
At this time you may find it convenient to quickly
program your remote control to have the capa-
bility of adjusting the volume control for the
DCR600
II
while it is set to control the DVD600
II
.
Press the
DVD Selector d and the Mute
Button
c at the same time, then press the
Volume Up Button s, then press the MAIN
Selector
h.
In addition to the transport keys located in the
lower portion of the remote, when in DVD
mode, you may use the arrow-key cluster in the
middle of the remote to access these basic
functions:
Fast-Forward
Right Arrow
Fast-Reverse Left Arrow `
Chapter + Up Arrow y
Chapter – Down Arrow
Play/Pause Set
When a CD is playing, the arrow keys will not
operate the transport controls while the Status
Banner is displayed. However, if you press the
Status Button e, the banner will disappear
and pressing an arrow key will affect the trans-
port as described above. The Status Banner will
then return to the display, and the arrow keys
will again have no effect on the transport.
Therefore, you should use the regular transport
controls at the bottom of the remote
–
when playing CDs.
For most discs, the DVD600
II
and DCR600
II
will
automatically select the correct surround mode.
To make sure that audio in the DTS audio format
is correctly processed, you must choose that for-
mat as the default in the DVD600
II
setup menu.
Simply stop play of the disc, and enter the setup
menu by pressing
Menu z on the remote.
Use the
⁄
/
¤
Buttons y to scroll down
to
Digital Audio Output. Press
the
Set Button to select this option, and a
screen will pop up, allowing you to choose from
PCM, Dolby Digital or DTS outputs. Use the
⁄
/
¤
Buttons y
to highlight DTS, then
press the
Set Button
to select this choice.
You do not need to reset the audio output for
other formats. The DCR600
II
and DVD600
II
will
automatically process PCM, Dolby Digital and
DTS signals correctly. Press the
Menu Button
z to exit the
menu screen. If you press the
Menu Button z
while the disc is playing, you
can access the disc’s menu to choose the DTS
format there as well.
28
31
29
40
33
28
31
37
36
35
34
33
40
33
28
31
28
31