


22
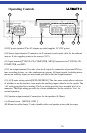
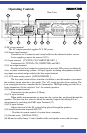
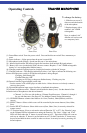
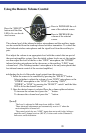
(1A) Momentary power switch– Push to Talk.
(1B) Continuous power switch– Slide up to lock on
and then talk.
(2) Power indicator –lights "green" when the power is
turned either momentary or continuous.
(3) Microphone (audio pickup) - speak into this
part of the microphone.
(4) Infrared signal emitters — the infrared signal
is broadcast from multiple infrared signal emitters.
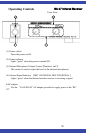
(5) Battery case— Slide the battery cover down to
remove.
(6) Charging terminal—charging input for charging
the batteries with the AC Adapter or the battery
charger
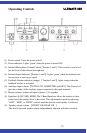
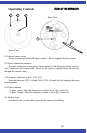
(7) Charging indicator—The charging indicator pro-
vides a "red" light to indicate the following con-
ditions when the power switch is off and the mi-
crophone is being charged.
Charging: Solid steady ON
Finished Charging: OFF
Charging error (trying to charge an alka-
line battery : Flashing very fast
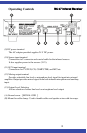
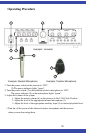
(8) External Auxiliary input terminal (on the side) -
Used to connect a CD or MP3 player or other device.
Allows the user to wirelessly connect a source to the
system.
(9) Single “AA” NiMH rechargeable battery or non-
rechargeable Alkaline battery.
(10) Channel assignment switch. Channel switch
(inside the battery case) - Set the channel of the infra-
red wireless microphone to the desired channel.
◎ Channels 1 or 2 for use with Achiever,
Ultimate II, Innovator. Channels 1 through
4 for use with Innovator..
●Uses two Panasonic NIMH AA rechargeable batter-
1B
9
7
3
4
8
2
10
5
6
Operating Controls
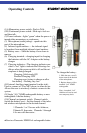
STUDENT MICROPHONE
1A
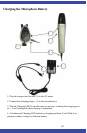
To change the battery:
1. Slide the rear cover(5)
down towards the bottom
of the microphone.
2. Replace battery with a
standard “AA” NiMH
rechargeable.
Note: A standard “AA”
Alkaline cell can be used
on a temporary basis.