


44
Listen to the
connected digital
component
Press FUNCTION repeatedly
until “OPTICAL IN” appears
in the display.
Record from a
connected digital
component to an MD
Press FUNCTION repeatedly
until “OPTICAL IN” appears
in the display.
Load a recordable MD, and
then start playing the digital
component.
Press REC/REC IT to place
the unit into recording
standby, and then press u at
the point where you want to
start recording.
To stop recording, press x.
Record from a
connected digital
component to a tape
deck.
While listening to the digital
component, start recording on
the tape deck.
Listen to the
connected tape deck
Press FUNCTION repeatedly
until “TAPE” appears in the
display.
Record from the tape
deck to an MD
Press FUNCTION repeatedly
until “TAPE” appears in the
display.
Load a recordable MD, and
then start playing the tape on
the tape deck.
Press REC/REC IT to place
the unit into recording
standby, and then press u at
the point where you want to
start recording.
To stop recording, press x.
To Do This
Operate the system
from a personal
computer
Connect the personal
computer to the PC LINK
connector using a Sony PC
connection kit (option) that
supports this system.
Listen with
headphones.
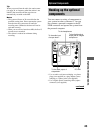
Hooking up the optional components
(continued)
Tips
• You can adjust the recording level after pressing
REC/REC IT (see page 26).
• You can record from a connected component with
the Smart Space function, Auto Cut function (see
page 25), and Time Machine recording function
(see page 21) operating.
• Thanks to the built-in sampling rate converter, you
can make a digital-to-digital recording to an MD
from a connected digital component with a
sampling frequency of 32 kHz, 44.1 kHz, or
48 kHz.
Note
Be sure to insert the plugs firmly, pushing them in all
the way. No sound will be produced if the plugs are
not inserted securely.
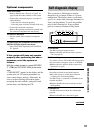
Connect headphones
(optional) to the PHONES
jack.