


Page 38
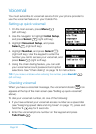
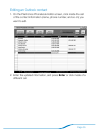
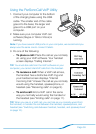
Click the Launch audio devices control panel button and
select the Audio tab.
Under Sound Playback and Sound Recording default
devices, make sure Plantronics Calisto Pro Series is NOT
selected. This allows your computer to direct audio sources
such as music to your computer speakers instead of Calisto.
Instead, select your computer speaker option (which might
appear under a different name).
Press OK.
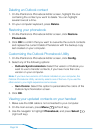
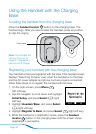
Once the VoIP Utility software is installed, plugging in the USB cable
should cause the following icon to appear in your computer’s system
tray: . If this icon does not appear, you may need to reinstall the
software. If the Calisto Pro is not detected by your computer, the
following icon appears in the system tray:
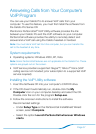
Launch the VoIP application:
With Skype: Upon launching the application, a screen appears
that reads Another program wants to use Skype. Select the
option Allow this program to use Skype.
With Yahoo!: Launch the Yahoo! Voice application.
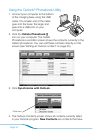
Configure your VoIP service (first-time use only):
With Skype: Launch Skype and select Tools > Options >
Sound/Audio Devices among the options on the left. In all
three pull-down menus—Audio In, Audio Out, and Ringing—
select the Plantronics option. Save these settings before
exiting the screen
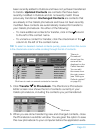
With Yahoo!: Launch Yahoo Voice! and select Messenger
> Preferences > Calling & Audio. In all three pull-down
menus—Microphone, Speakers and Ringer—select the
Plantronics option. Select Apply before exiting the screen.
Note: If the “Call Set Up Assistant” is disabled, it has no effect on Calisto’s
ability to place VoIP calls.
Note: For the latest software troubleshooting tips, see
www.plantronics.com/downloads.
–
–
–
–
4.
–
–
5.
–
–